Announcement

Collapse
No announcement yet.

The CR-X

Collapse
X
 
  • Filter
  • Time
  • Show
Clear All
new posts

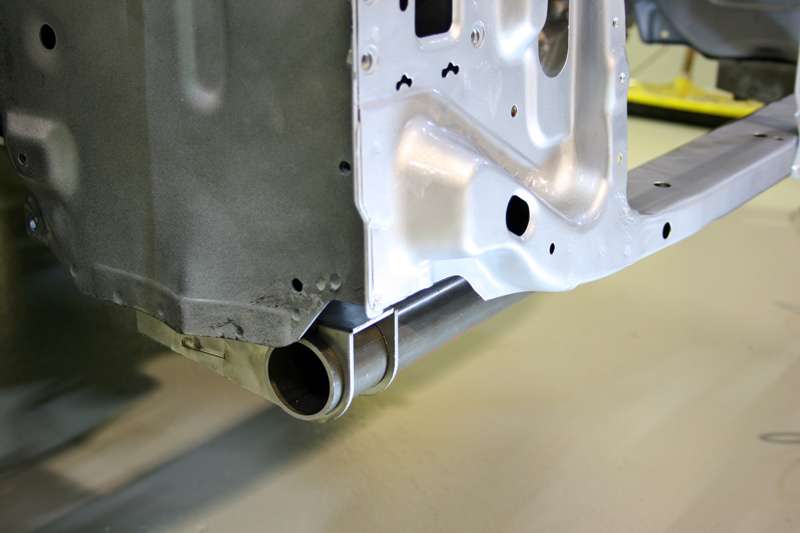
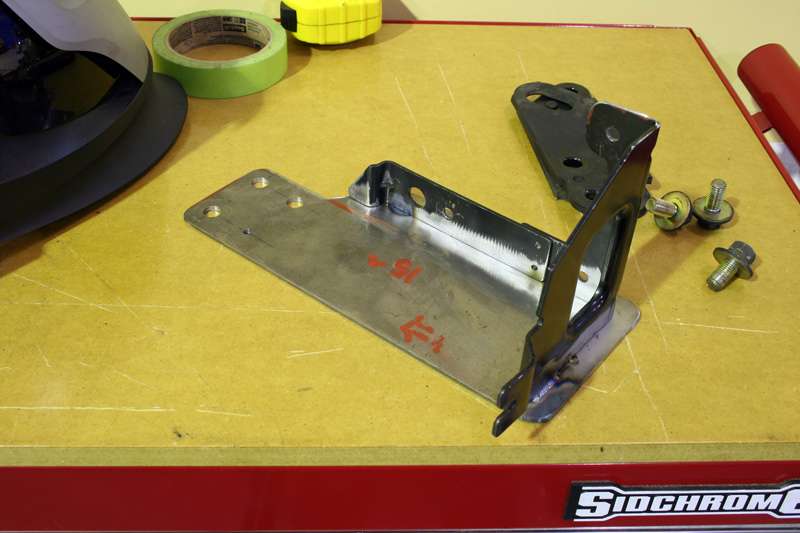
    Making some more slow progress, I better pick up the pace given it's only 45 days until I need to attack the time at Sydney Motorsport Park. Over the weekend I got my front suspension cross-member (traction bar as the kids call it) all mocked up:


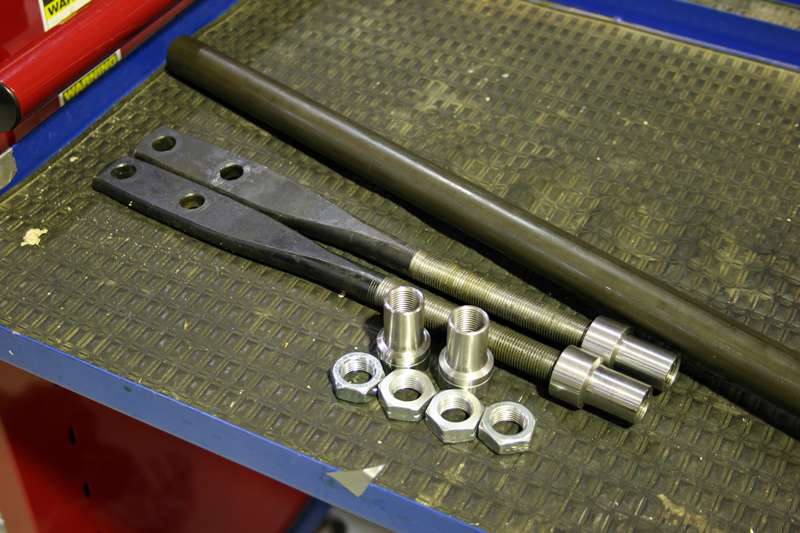
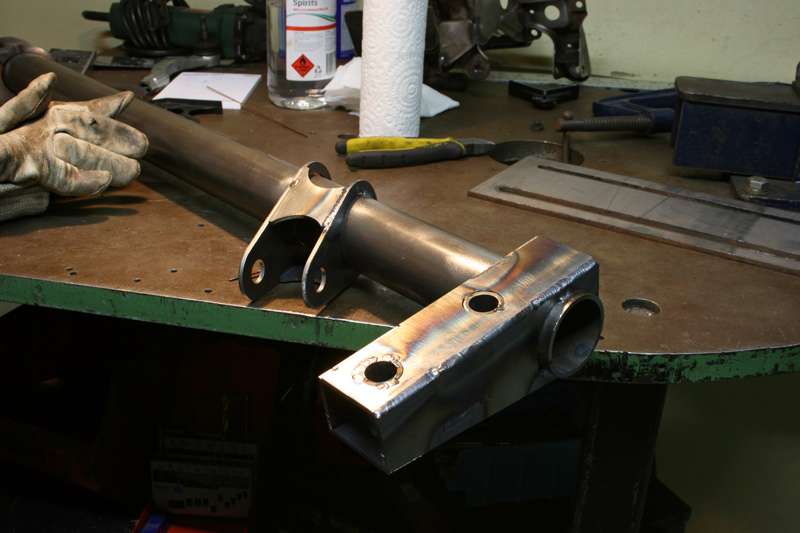
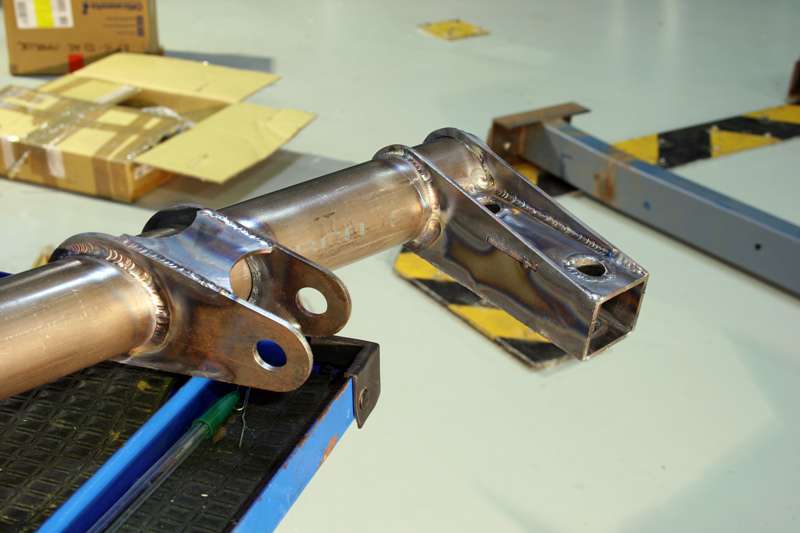
    Here's all the bits that go into my fabricated radius rods. Some 1" .120 thick tubing, left and right hand tube ends, jam nuts and the standard radius rods which have been shortened with a 5/8"-18 thread cut into them.


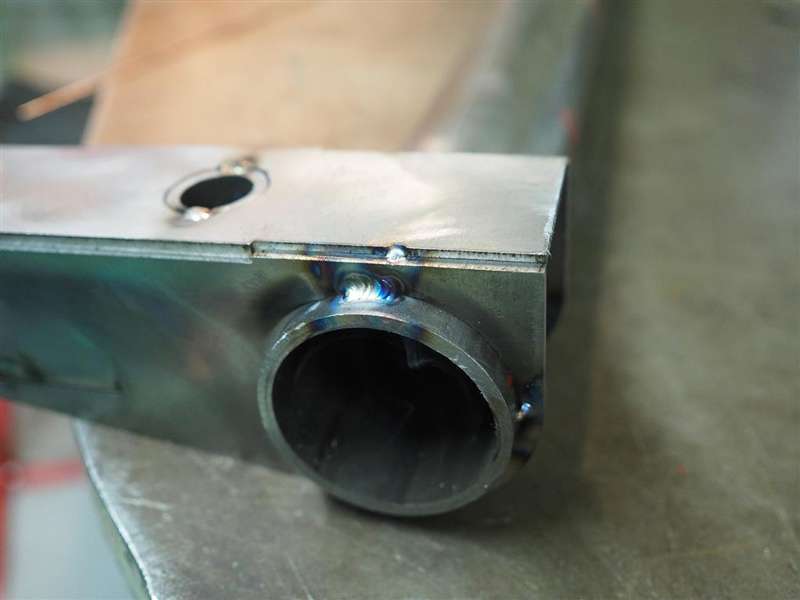
    Welded the tube ends to the tube section and fitted the whole assembly in the car to double check the measurements of the tabs where the radius rods attach, and then tacked it together.


    I'm now part way through fully welding it so I'll finish it off tomorrow evening and give it a coat of paint since I don't have time for another batch of powdercoating before WTAC:


    On Saturday I picked up my bumpers, front lip and trim from the panel shop all freshly sprayed with the correct matte finish in the right spots. I cannot tolerate CR-Xs with gloss painted trim and mouldings, it grinds my gears immeasurably, but luckily the matte painted finish has turned out great as the mouldings were very faded before.


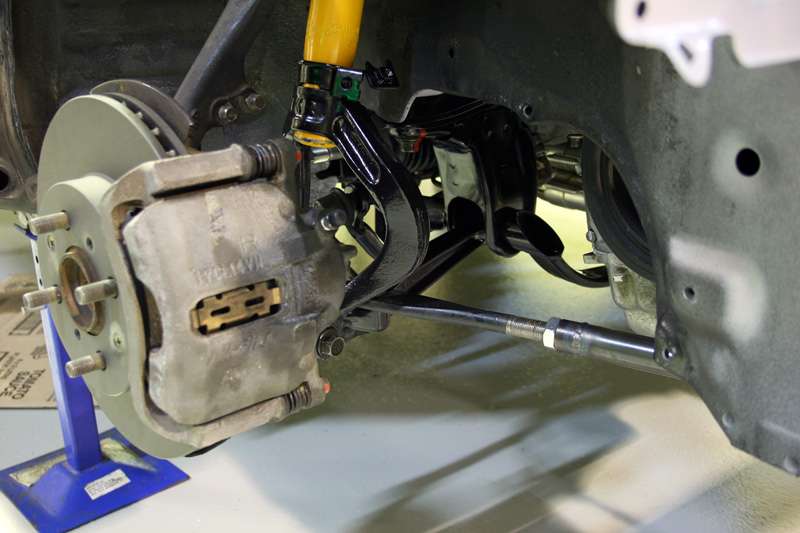
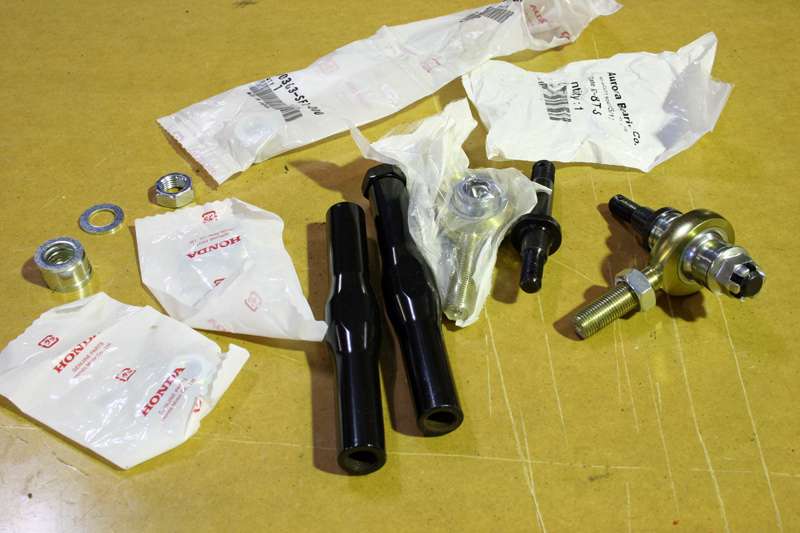
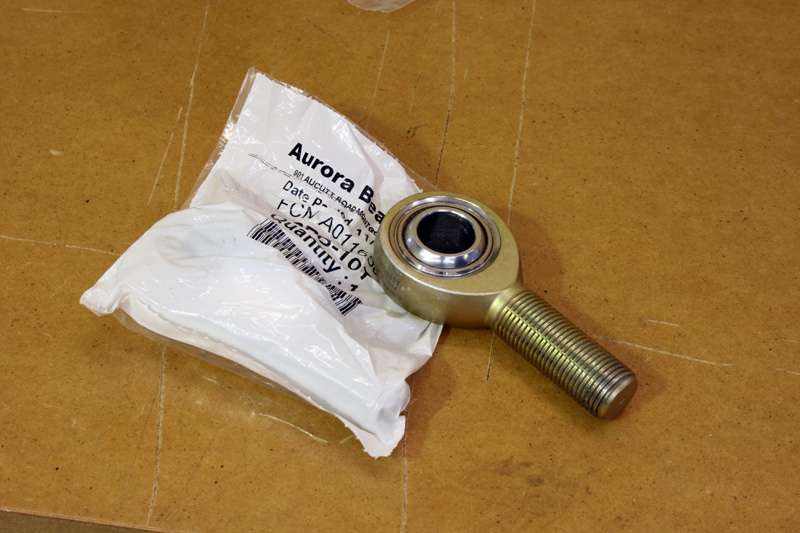
    I've also fitted up a pair of the tie rod ends that itsu-san and I have been developing. They're only loosely installed at the moment as I still need to roughly set the toe, measure the bump steer and add or remove spacers beneath the outer rod end to correct it if necessary. This should be a good test of the kit as the EF8 will have around 3 times more power than the EF2 that I've already got the kit on and should develop a much greater cornering forces once I put some proper tyres on it.

    Here's all the bits in the kit:


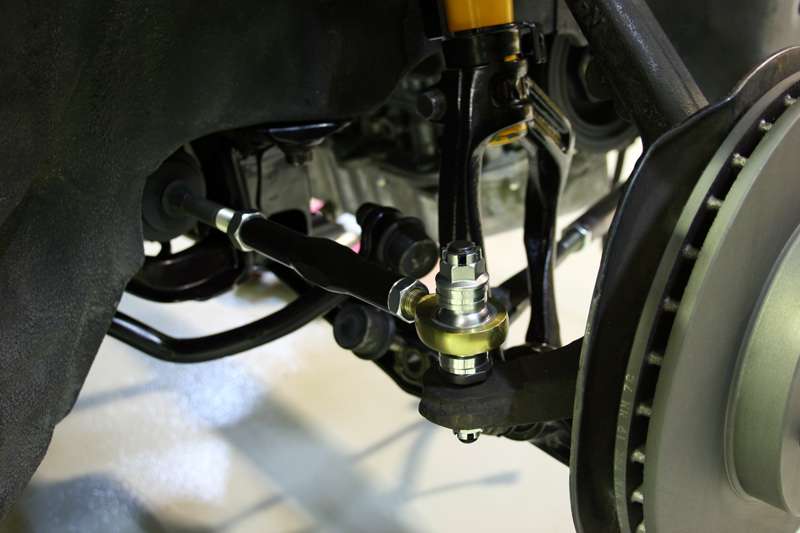
    Here they are roughly assembled. I had to shorten the black turn-buckle section by about 12mm as the EF8 tie rod end, like much of the car, is a special snow flake and shorter in length than all the other 88-00 double wishbone Hondas.


    Installed:


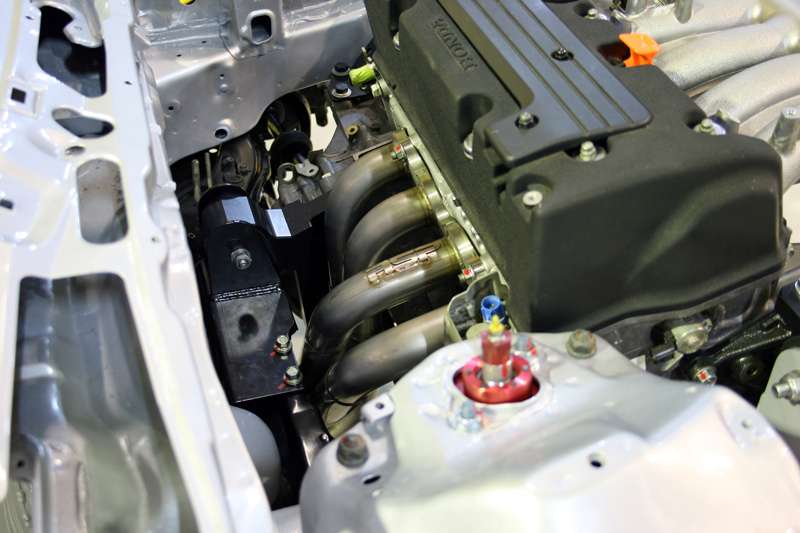
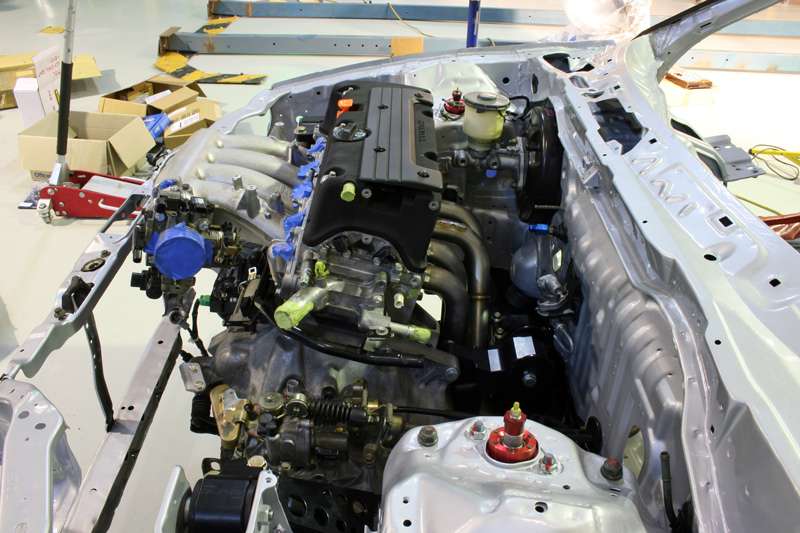
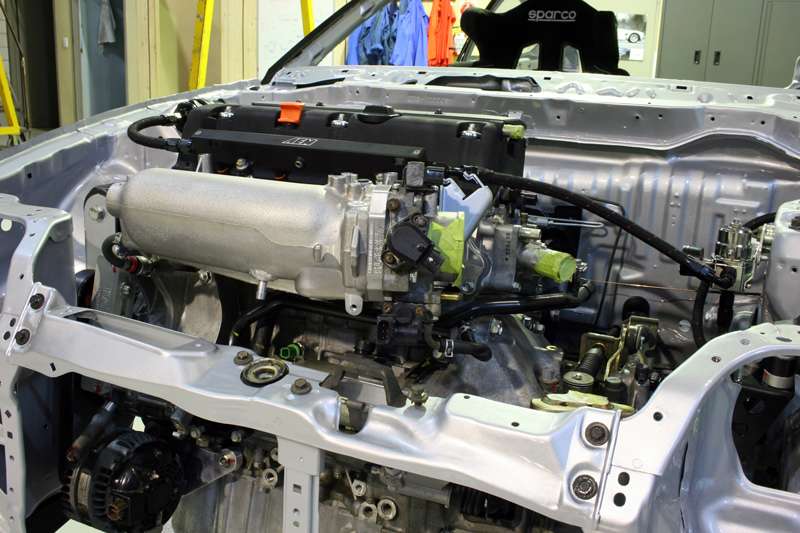
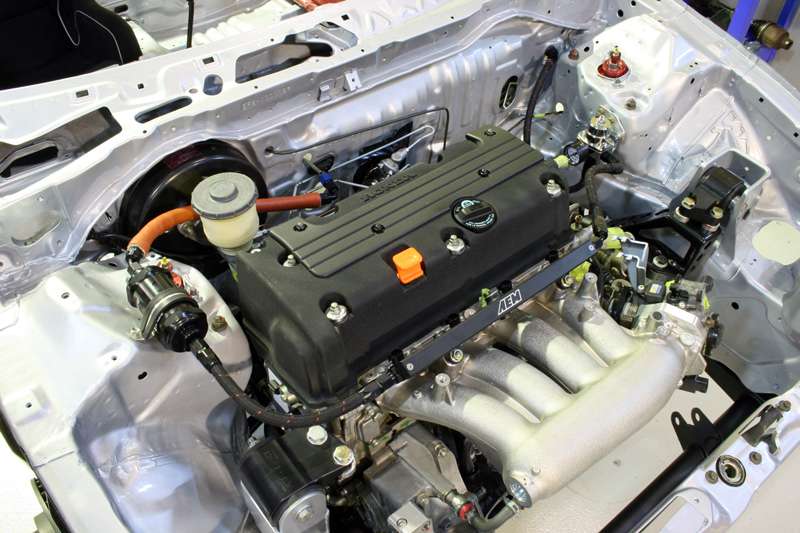
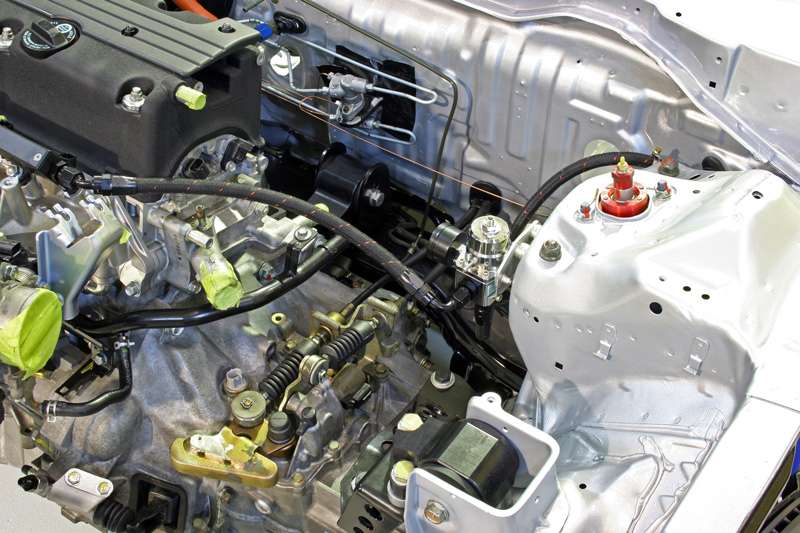
    I also fitted up the ASP header, which required a bit of tweaking of the engine mounts to get enough clearance to the steering rack as I foolishly didn't check clearance with the rack installed when I test fitted it a long time ago. I think that the header might have been designed for a car with manual steering, not the bulkier power steering rack that I have.


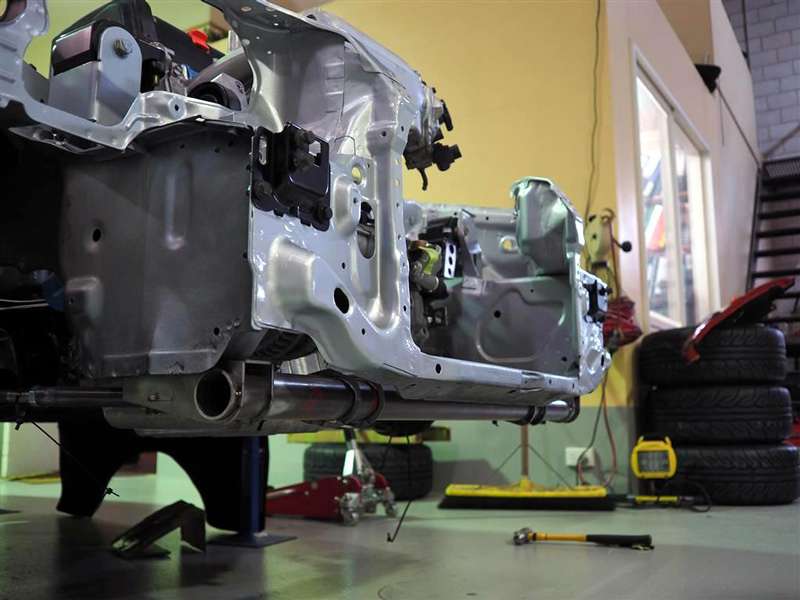
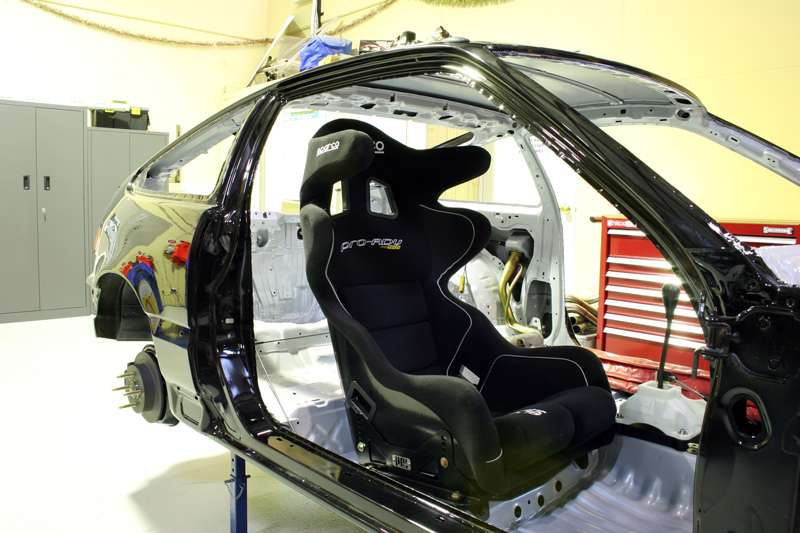
    Thanks to Ying and Dan from EXE for the support and photos over the weekend. More updates soon, the car is close to rolling so next up I'll move on to plumbing and wiring, and will get the glass installed soon and start fitting some panels.

    Comment


      cant wait till its finished!

      Comment


        Originally posted by sugz View Post
        cant wait till its finished!
        Thanks, me too!

        More updates since last week. Over the weekend I got a few things done, and have been steadily ticking things off the list since then. Started off on Saturday by putting a coat of paint on my pedal assembly and putting it all together with the new EP3 master cylinder:


        Installed it in the car, and clearances look okay, now I just need a clutch hose made up to suit and I should have a working clutch. Haven't quite worked out where I'll mount the reservoir yet, but I'm thinking I'll run a hose back through the firewall and tuck it up next to the brake booster somewhere.


        I finished welding up the traction bar:


        Then gave it a coat of paint test assembled it and bolted it in to the car. I'm using some Aurora high performance series rod ends, which should hopefully last pretty well. They've got a radial load capacity of over 11 tons so they shouldn't be highly stressed in this application.


        After that I installed the shifter and cables, along with the master cylinder and booster. The position of the gear knob seems good, though it might be better a little further back given my height so I might put in the vice and give it a bend:


        Somewhere around this time I installed the fuel tank with the Aeromotive pump, and put all the hard lines back in. On Sunday I plumbing the car continued. Grant (itsu-san) came around and started making up the new hard lines in the engine bay to suit the new brake proportioning valve location (the old spot it was mounted is now occupied by engine) which you can see a bit further down. Thanks guy. Then after he left I broke the tube bending tool, so have ordered another one to finish off the lines.

        While he was doing that I pulled the intake manifold off to remove the original fitting for the brake booster vacuum next to the throttle body mounting flange, weld up the hole and then weld on a barb on the bottom side. The aim of this is to avoid the vacuum hose to the booster hanging out of the hole in the bonnet.


        That's about where the weekend finished. On Monday evening I made up all the flexible fuel hoses. I'm using Aeroquip lightweight hose and fittings, and yes that blue fitting bothers me as well, so I might cut the end off that hard line and use a different fitting.


        Those that have been following from the start might notice that I routed the system differently to how I planned long ago, as after I had the motor in the car this seemed the obvious way to do it. However I will probably have to move the fuel filter down and forward slightly, as I think it will hit the bonnet where it sits now.

        The orange stuff is a heat resistant sleeve made by Aeroquip, which I added to give me a bit more piece of mind given how close the fuel line is to the exhaust manifold. Here's the fuel bits on the other side, including a janky bracket I made to mount the fuel pressure regulator. Can also see the nice brake hard lines that Grant made up:


        Test fitted my seat. Seems like the driving position should be good, though I think next time I pull the car apart I'll mount the seat directly to the floor and fit some reinforcement underneath. The extra 20-30mm that would give me would be nice.


        Tonight I built a bracket to mount the power steering pump, using a bit of 3mm plate and the original Astra bracket cut down a bit. The only location that seems to work without putting it inside the cabin (which isn't ideal since it's just my street car) was down next to the chassis rail on the passenger side. Not great for weight distribution but at least it's convenient for the hoses and accessible to fill it up.


        Fully welded and mounted:


        Lastly with the help of another friend we started planning out the wiring. The setup is fairly basic, just an OEM DC5 engine and charge harness, which we'll modify to suit the battery and fuse box locations on the EF, a Rywire conversion harness to make all the important bits work, and during the process I'll strip some unused bits out of the harness (AC wiring, B series wiring) and tidy it up a bit:


        More updates as they happen. Radiator should be here soon, and there's another large package winging its way toward me from Japan too.

        Comment


          Mind blowing!

          Really keen to know how easy / difficult it is to set up the electric power steering - can you provide detailed instructions please?

          Comment


            Keep up the great work there Tom. I was hoping to see your name on the EXE Winton weekend groupings though . 36 days until your fancy track weekend begins!
            1999 Formula Red S2000 Blog

            Comment


              Originally posted by Apu View Post
              Mind blowing!

              Really keen to know how easy / difficult it is to set up the electric power steering - can you provide detailed instructions please?
              Thanks! Once I've got the PS setup in and done I'll give a bit more detailed writeup and some more photos, but Grant/itsu-san is giving me a lot of help and doing most of the thinking there. This is my understanding from what he and I have discussed though:

              - I'm using the Astra PS pump and bracket. The pump has 4 wires: Power, earth, alternator switched power (so the pump doesn't run before you start the car), and another control wire which probably served as speed control for the pump on the original install
              - The main power will be through a relay, direct wired to the battery/alternator circuit with a fuse in line. The other wires will just be connected to a convenient spot in the DC5 charge harness.
              - Then I'll have some flexible hoses made up to connect from the power steering pump to the original CR-X hard lines that run over the top of the suspension sub-frame and stick out on the passenger side, you can see them in the 8th picture in my post above.

              Originally posted by eskimo_firefighter View Post
              Keep up the great work there Tom. I was hoping to see your name on the EXE Winton weekend groupings though . 36 days until your fancy track weekend begins!
              Thanks guy! Yes I was disappointed to not make it to EXE, but it was a very ambitious goal given that it was less than 4 weeks from when I got the car back from paint to the event .

              Comment


                All that wiring!

                Nice update and nice welding.
                ClubITR | Like

                Comment


                  Thanks Tom! I've already bought the Astra pump! So looking forward to your notes.

                  Originally posted by ChargeR View Post
                  Thanks! Once I've got the PS setup in and done I'll give a bit more detailed writeup and some more photos, but Grant/itsu-san is giving me a lot of help and doing most of the thinking there. This is my understanding from what he and I have discussed though:

                  - I'm using the Astra PS pump and bracket. The pump has 4 wires: Power, earth, alternator switched power (so the pump doesn't run before you start the car), and another control wire which probably served as speed control for the pump on the original install
                  - The main power will be through a relay, direct wired to the battery/alternator circuit with a fuse in line. The other wires will just be connected to a convenient spot in the DC5 charge harness.
                  - Then I'll have some flexible hoses made up to connect from the power steering pump to the original CR-X hard lines that run over the top of the suspension sub-frame and stick out on the passenger side, you can see them in the 8th picture in my post above.

                  Comment


                    Originally posted by Apu View Post
                    Thanks Tom! I've already bought the Astra pump! So looking forward to your notes.
                    Is there any particular reason why the Astra pump was chosen?
                    ClubITR | Like

                    Comment


                      Originally posted by felixR View Post
                      Is there any particular reason why the Astra pump was chosen?
                      No specific reason, though the Toyota MR2 pumps are typically used in the US where they don't get the Astra or an equivalent. Compared to the MR2 pump the Astra pump has the following pros and cons:

                      Pro:
                      Cheap ($53 compared to hundreds for the much rarer MR2 item)
                      Available (There were more than 15 suitable Astras at the local wreckers)
                      Self contained reservoir
                      Self contained wiring, no separate control ECU or similar

                      Cons:
                      Might be heavier than the MR2 unit
                      Integral reservoir makes it a bit harder to locate in the engine bay

                      A fellow on another forum has suggested an EPS system which you can get out of a Barina, which is another option to explore if this setup doesn't meet expectations.

                      Comment


                        I paid about $165 off eBay (but it's supposedly a new TRW unit) - that's still cheaper than an MR2 unit. I figured I'd get it cheaper if I went to a wrecker but I think the time involved would have cost me more than $100...

                        After reading Itsu-San's thread, I did a bit more reading and the big plus with (either) unit is it's a "dumb" unit - just power up and it pumps away.

                        If I recall correctly, the MR2 units are harder to come by and can cost up to twice as much...plus a little more complicated to set up.

                        It is a tall bugger though isn't it Tom?
                        Last edited by Apu; 10-09-15, 06:24 PM.

                        Comment


                          Originally posted by Apu View Post
                          I paid about $165 off eBay (but it's supposedly a new TRW unit) - that's still cheaper than an MR2 unit. I figured I'd get it cheaper if I went to a wrecker but I think the time involved would have cost me more than $100...

                          After reading Itsu-San's thread, I did a bit more reading and the big plus with (either) unit is it's a "dumb" unit - just power up and it pumps away.

                          If I recall correctly, the MR2 units are harder to come by and can cost up to twice as much...plus a little more complicated to set up.

                          It is a tall bugger though isn't it Tom?
                          Yup, it didn't look that big when I pulled it out of the Astra but it's pretty large when you need to fit it into increasingly limited real estate in an EF engine bay. Be sure to post up your experiences with yours .

                          The big box I mentioned above turned up at work today from everyone's mate Mr Streeter.


                          Opened it up to reveal 1.5m of wang, custom made for me by the good hard working folks at Voltex:


                          So I had to take a few minutes to mock it up on the car to see how it would sit.


                          Very pleased. The wing is a Voltex Type I in wet carbon, 1500mm wide, with type A end plates and 195mm stands. Happy with the fitment but the way that Voltex mounts it will probably need a little work to make sure it won't fall off. Given the short wheelbase of the CR-X and the oversteer biased suspension setup I'll be using it will be good to have the wing to tune in a slight aerodynamic understeer at higher speed, so I don't end up exiting T1 at SMSP backwards.

                          Comment


                            Will do Tom. Mine's going into the MX5 first though...that will be tight!

                            Comment


                              Nice wing! I have the same one on the s2k but with 295mm stands haha

                              Comment


                                Originally posted by ChargeR View Post
                                Happy with the fitment but the way that Voltex mounts it will probably need a little work to make sure it won't fall off.
                                I had to put wider high tensile washers on the under side of the bolt to help spread out force of the wing. Without it, it had bent and de-formed the boot mounting holes.

                                Bummed I won't be seeing it tomorrow at Winton!

                                Comment

                                Working...
                                X