nice updates Todd. Keep em coming! With that NA IS BEST decal, isnt there usually a pic of a turbo with a line going thru it as well? Or did you just cut that bit out
-
-
Yep usually a turbo pic. I just cut it off though. Looked bad with it. I like how it looks without the pic with just the writing.Originally posted by stephen8512 View Post
Also currently at work bored so I'm writing up the next update. Will upload the pics in the morning once I'm home so check back in tomorrow
Comment
-
Still at work, mate?!Originally posted by Toddxxx View Post1997 Honda Civic EK4
Winton - 1:34.94
Bryant Park clockwise - 55.58
Bryant Park figure 8 - 61.30
Wakefield - 1:10.16
Phillip Island - 1:55.43Comment
-
-
haha actually yeah i still need to upload. Give me half an hourComment
-
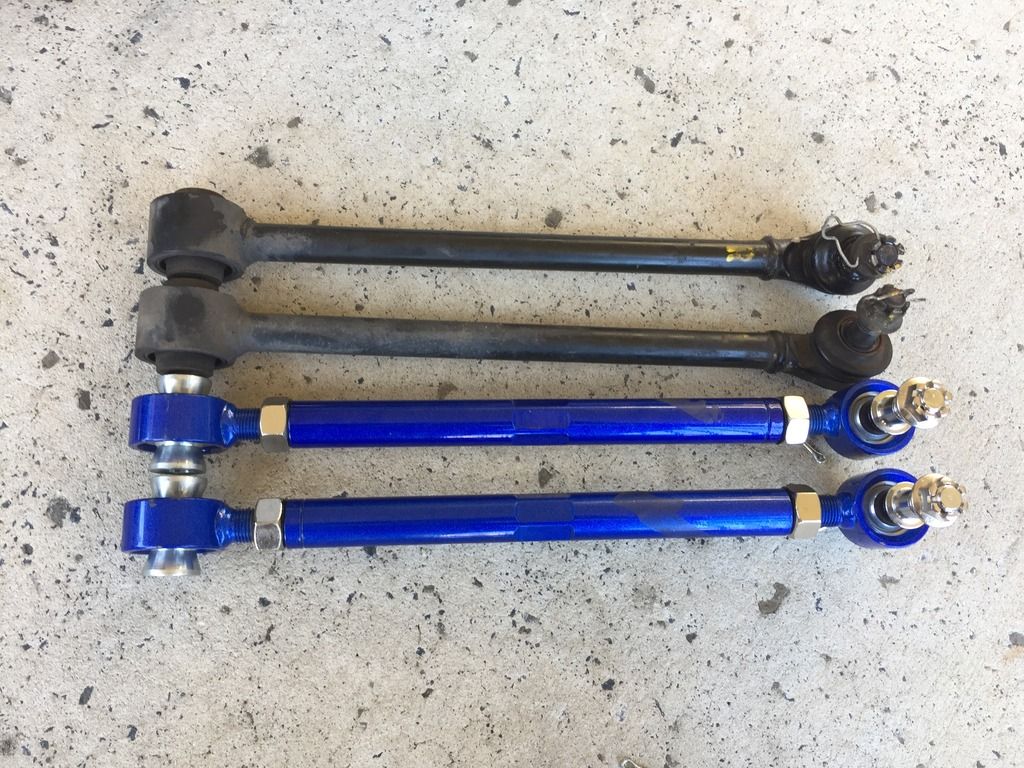
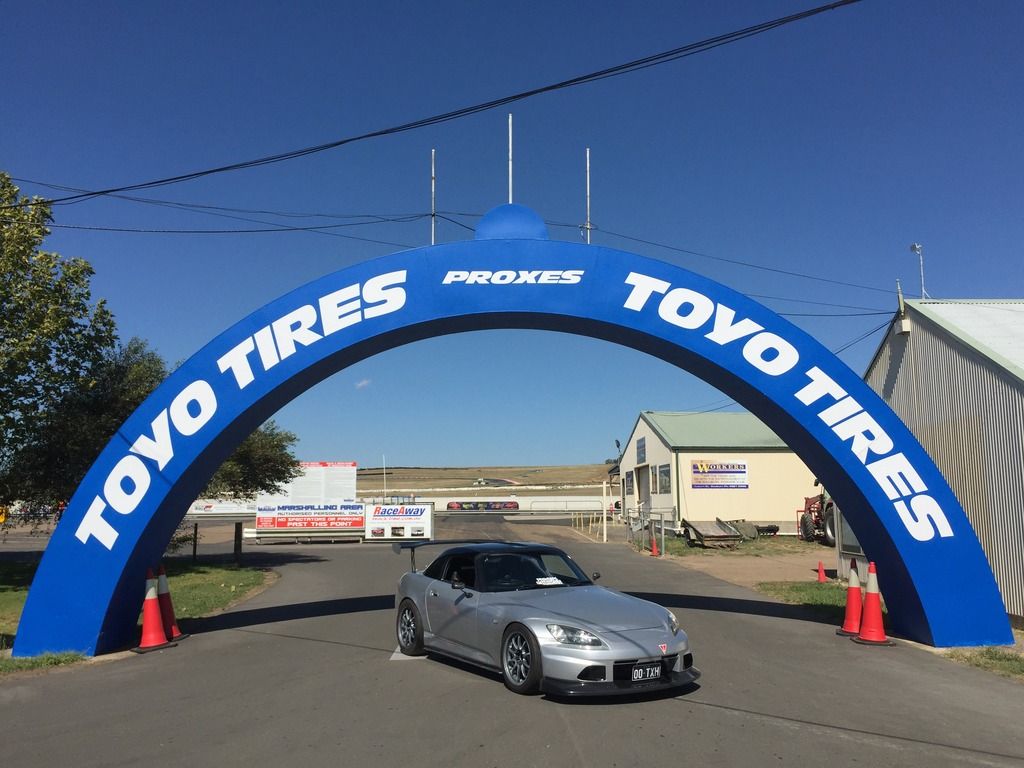
If you have been reading my previous updates then you will remember that at the JDMYARD EOYM i picked up my hardrace front camber joints and rear toe arms. Well over the weekend it was finally time to install them
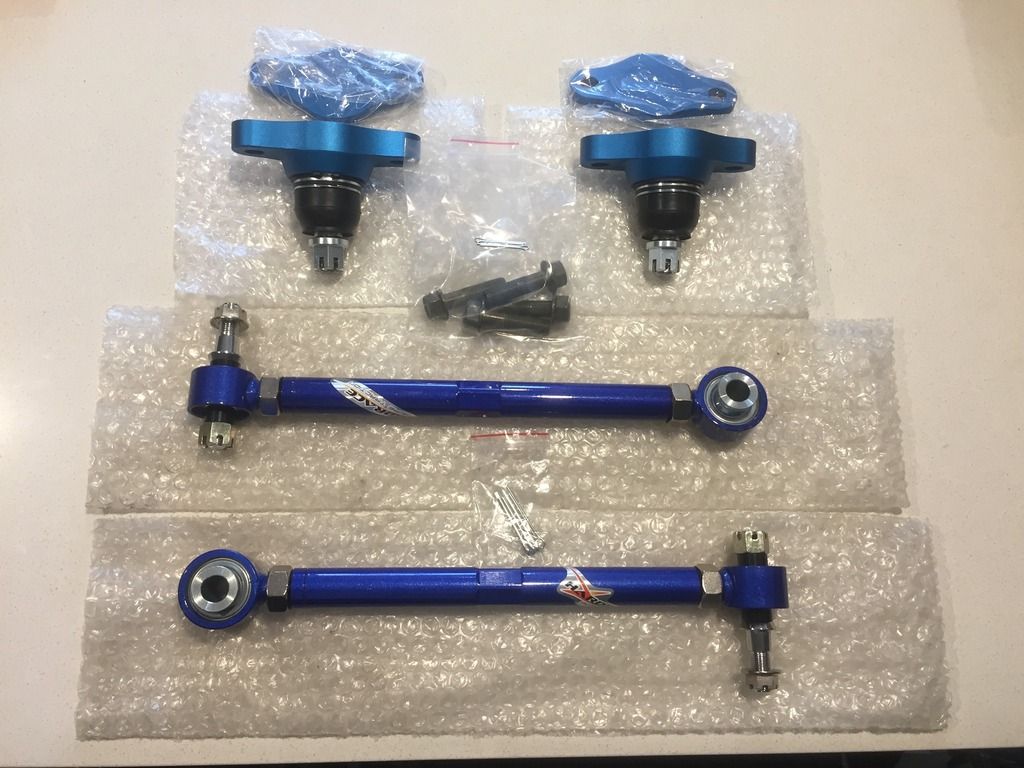
Previously my alignment specs were decent but somewhat limited. The front camber was maxed out at -2.2 degrees and my castor could only go to about 5 degrees. In the rear i could achieve my desired alignment specs but the rear is known for its bumpsteer issues thus the twitchy rear end in the AP1.
Honed did a good post on the subject.
http://honeddevelopments.com/ap1-s20...er-correction/
The purchase of the two hardrace products was done to help in these two areas and allow for better and more track orientated alignments and hopefully this will make the car a lot better to drive at the track.
Note: installation of these parts will require you to remove ball joints. You can use two methods to remove the ball joints. Either use a ball joint separator tool or the good ol hammer and brute force method. I used the hammer method mainly because i forgot all about buying the ball joint separator until it was too late. The hammer method worked fine though and got all ball joints separated with ease.
So lets start at the front.
The car was jacked up and the wheels removed. I removed the lower cotter pin and castle nut from the joint and put the castle nut back on upside down as this was going to be my contact point for the hammer. Couple of hits and the ball joints popped out. After that it was the simple task of undoing the two bolts that held the joint to the arm and the whole assembly can be removed.
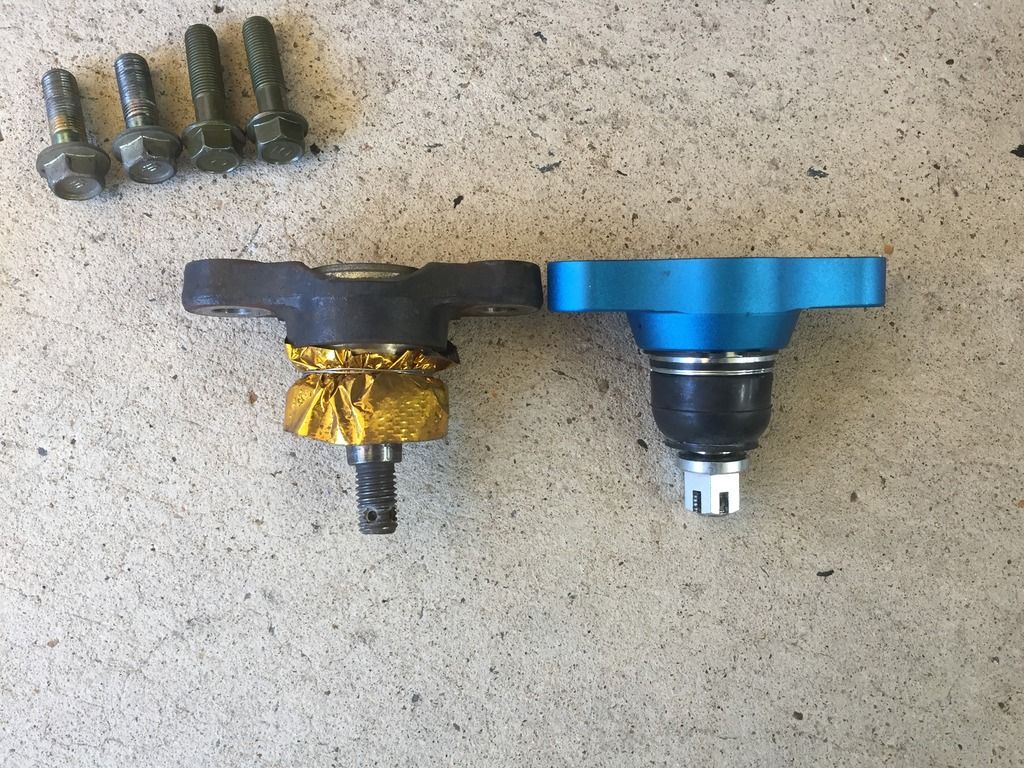
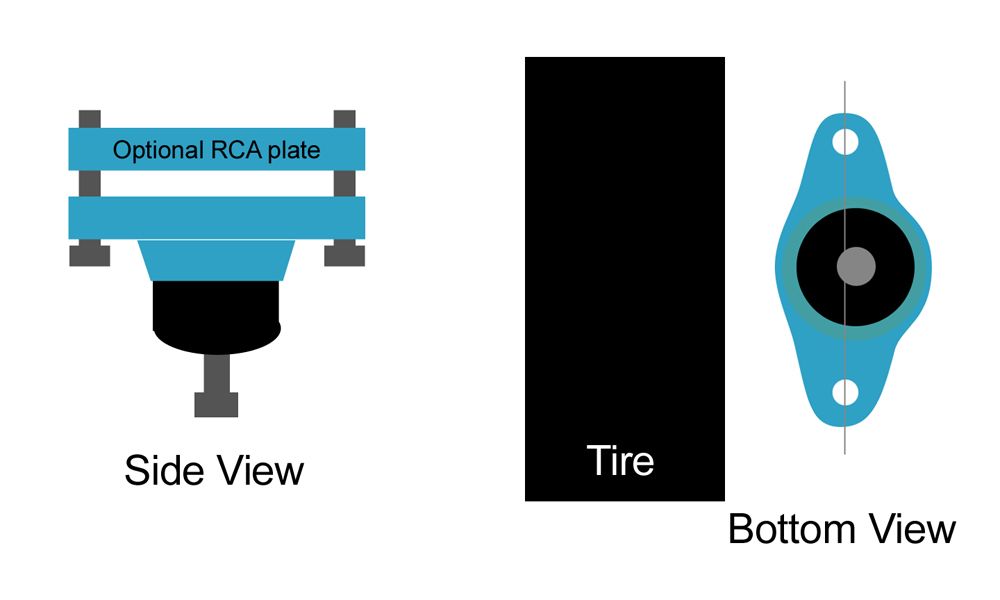
Here is the stock joint next to the hardrace joint. As you can see the joints are the same height as the hardrace units come with no in built RCA correction that some of the other kits like the js racing and buddyclub offer. This becomes very important later on after installation with height adjustment as the units with built in RCA will lower the car. As the hardrace kit comes with additional RCA plates and i didnt install them yet i didnt have to worry about all this and the car was good to go after the install.
From this point the install is just a reversal of taking the old unit out. One point to note though is which way to install the joint. What you want is for the offset bit to be towards the inside of the car so it pushes the bottom of the wheel outwards.
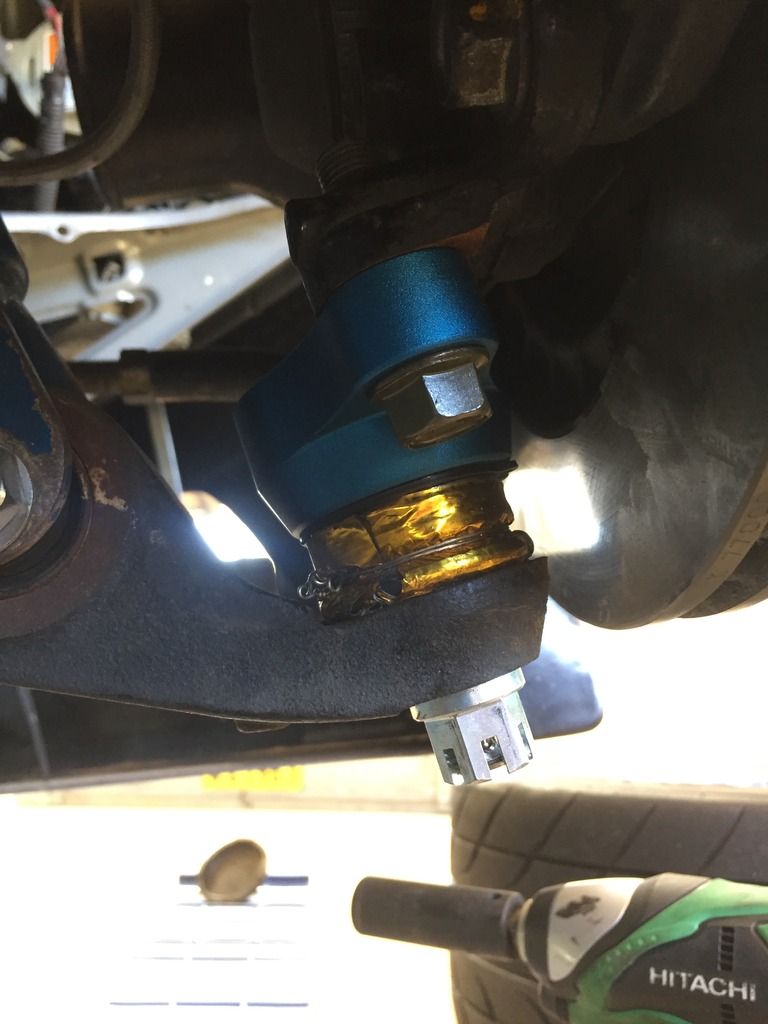
And here is the new joint all reinstalled with the heat tape transferred across etc
Now onto the rear
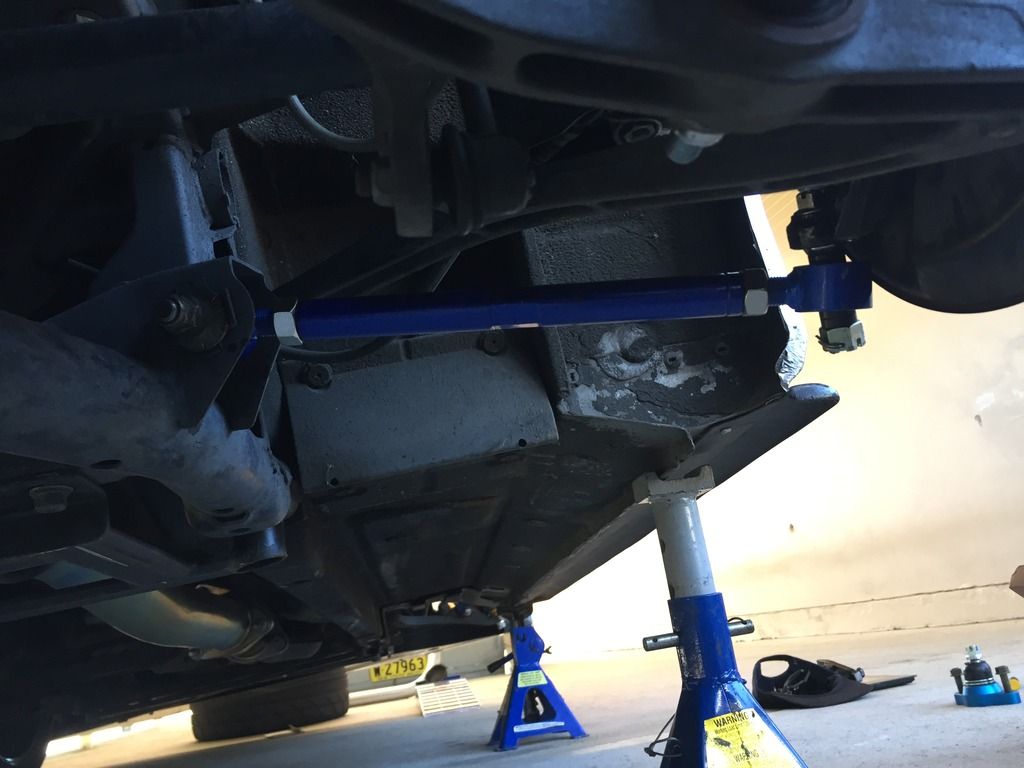
Once again the car was jacked up and the wheels removed. Removing the OEM toe arms is pretty straight forward. First undo the alignment bolts on the inside and then remove the cotter pin and castle nut on the outside and again use the hammer to knock the balljoints out. Once the arms are off the car use them as a reference to adjust the hardrace arms to the correct length.
After the arms are adjusted reinstall in the reverse order again. He they are installed
While I had the car up in the air I finished a few little jobs that had been on the back burner for far too long.
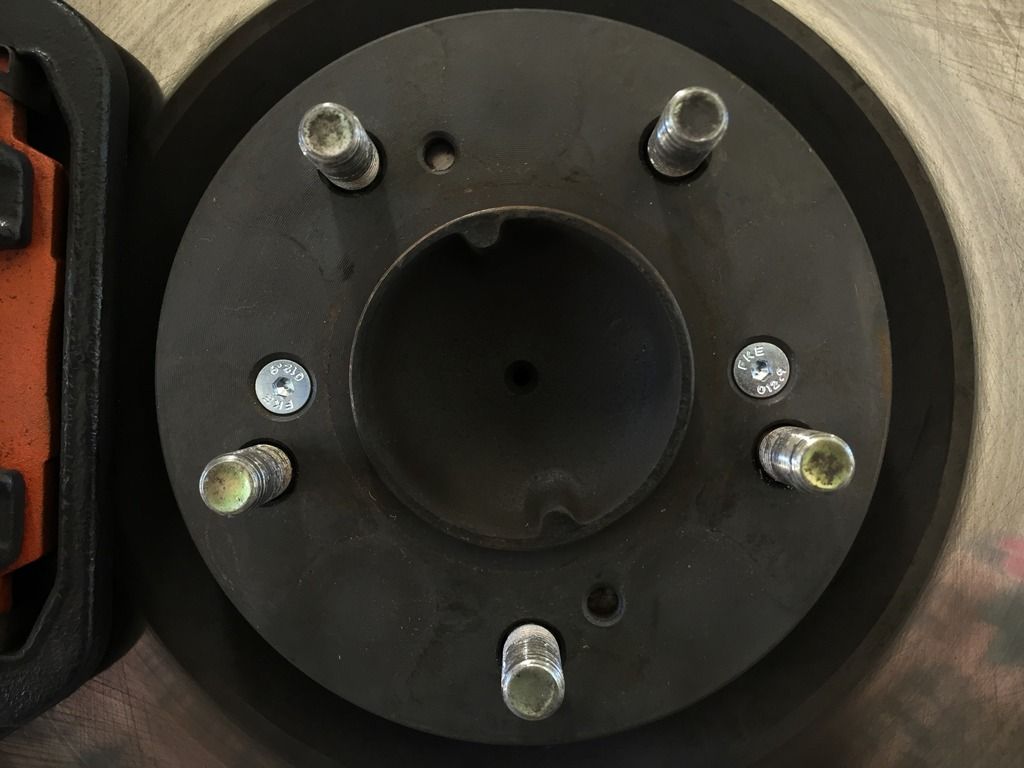
The stock rotor screws seem to strip far too easily and using a screwdriver to turn them when they're seized is a massive pain. Saw that a guy in Melbourne had installed hex head replacements and I thought this was a great idea and wanted to do the same. Quick trip to the bolt shop and now have these shiny replacements for the old worn out Phillips head units.
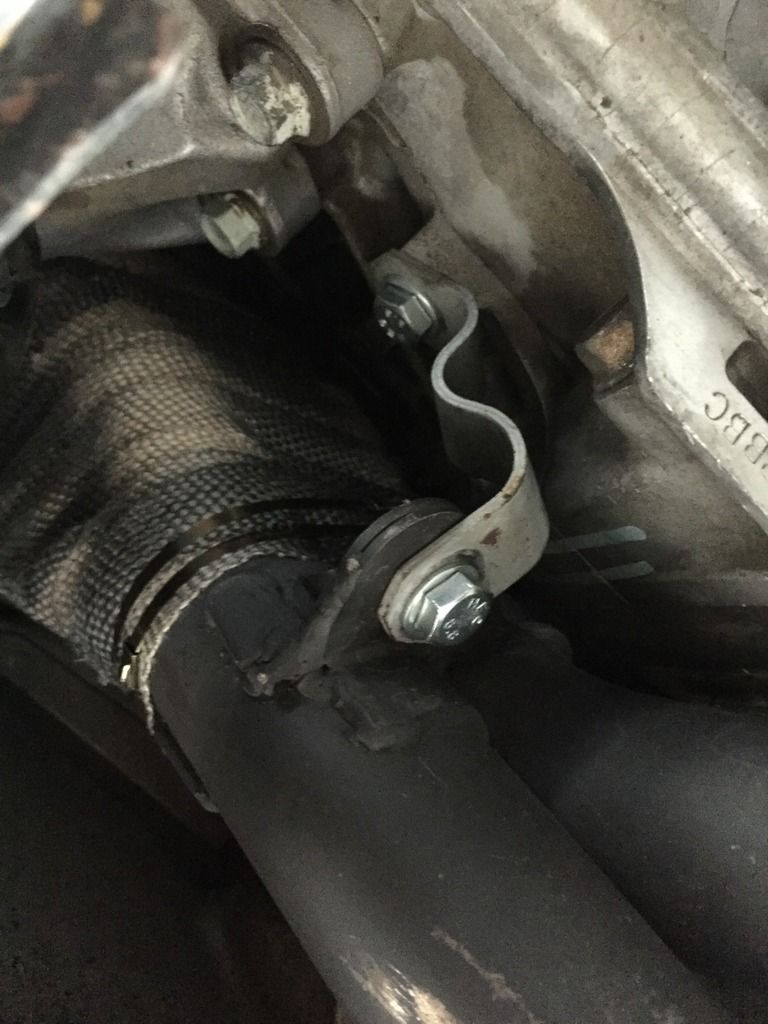
For quite a while i had experienced a metallic ringing noise whenever the motor got above 4000rpm. I suspected some part of the exhaust system had come loose and once checking over the back section and finding nothing i suspected that the issue may have been the OEM header bracket. When i was under the car doing my regular oil change i had the chance to look at the bracket and as suspected one of the bolts had come loose and fallen out at some stage so the bracket was vibrating against the motor.
While grabbing the rotor screws i also grabbed some replacement bolts for this part and now with both sides tightened there is no more noise.
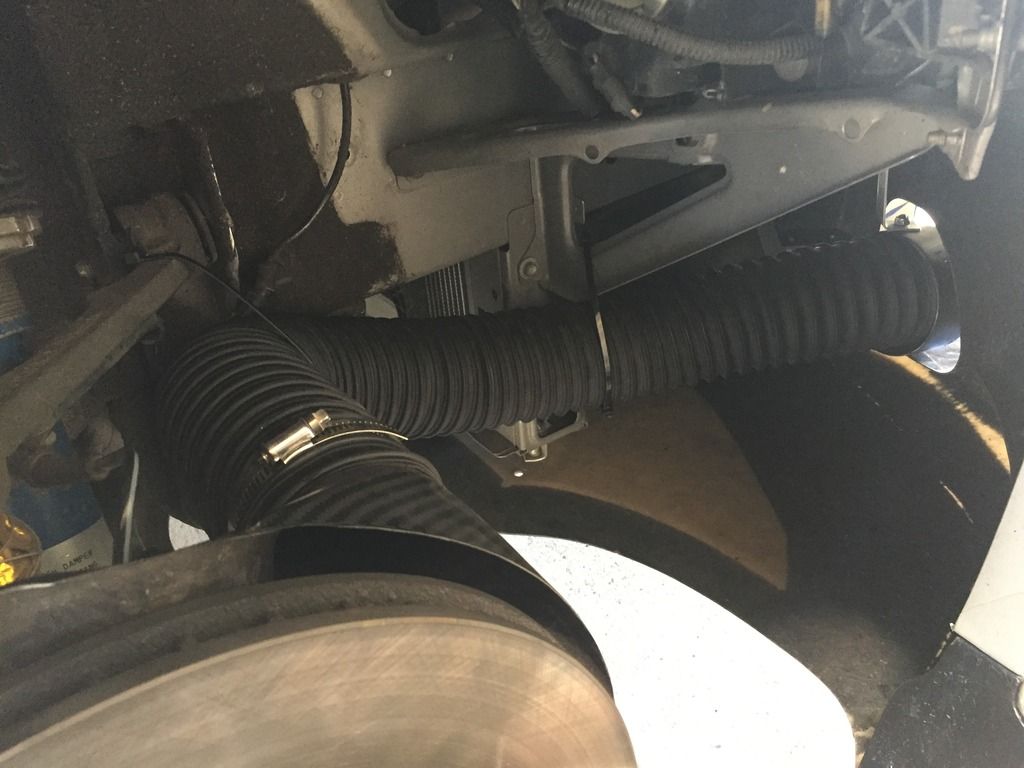
The final job was to get my new brake duct hoses installed. These new ducts are more stealth being black in colour but are also much thicker than the previous ones so they hold up a lot better as well.
Now with everything done i booked in an alignment with garage88 to sort out my new alignment specs. I decided to keep my specs similar to my old ones for now and just increased the front camber from -2.2 to -3.0. The front castor was also able to be increased to 5.9 degrees. Front toe was kept the same at 0. The rear has the same toe setting of 1mm toe in each side so 2mm total (this is recommended with the toe arms so previously i was actually running quite a bit less than i should have). The rear camber also now sits at -2.5 as that's the minimum that could be achieved with the arms at their current length.
Keeping the specs similar to before will allow me to accurately gauge how much the added front camber helps with turn in and how much the toe arms assist im bumpsteer prevention. The good news is though that i have much more freedom with alignments and can adjust a lot more in the future should i wish to so i might play around with the settings some more next time.
Now why do all this? Because tomorrow ill be heading to wakefield for my first track day in 6 months! Long overdue and im excited to get back. Hopefully everything goes well and i will have a report on the day soon.Comment
-
Wakefield was good. No pb but a good fun day with friends. Had turns driving each other's cars etc. Made a few guys want a S2KOriginally posted by felixR View Post
First sots day so very different to the usual trackdays I attend. Not much track ettiquate and guys just out to creep around turns then blast down the straights
Gold tape is heat reflective tape. If you notice in the installed camber joint pic I don't have a heat shield behind the rotor anymore because I run the brake ducts. This exposes all the balljoints and rubber boots to those extreme temperatures. Lots of melted boots and dried out balljoints because of this. Bit of heat reflective tape or heat wrap and they're at least protected a bit. Top Japanese cars tend to do this (lots of pics in hyper rev mags) so itmust work
Last edited by Toddxxx; 23-02-17, 07:01 AM.Comment
-
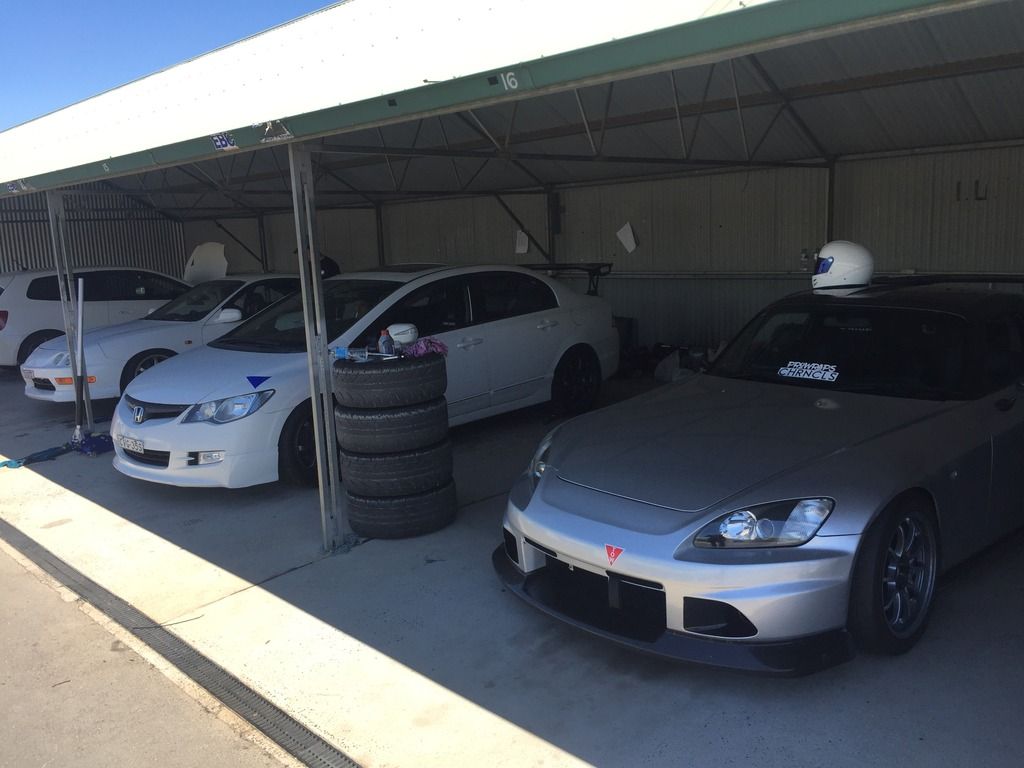
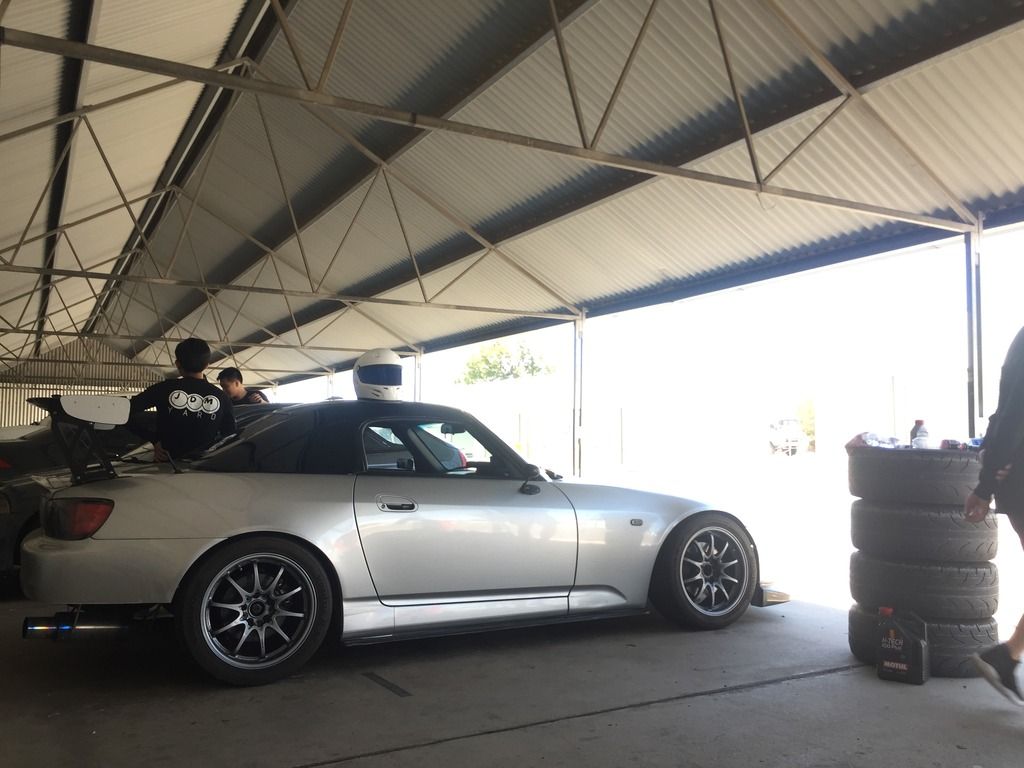
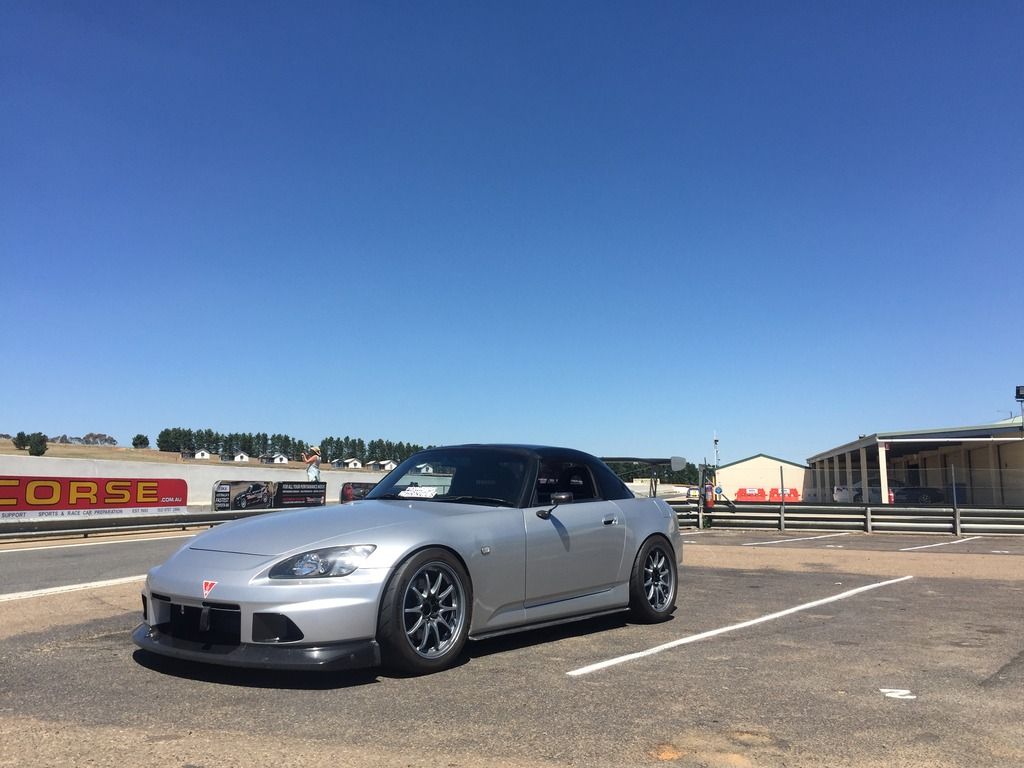
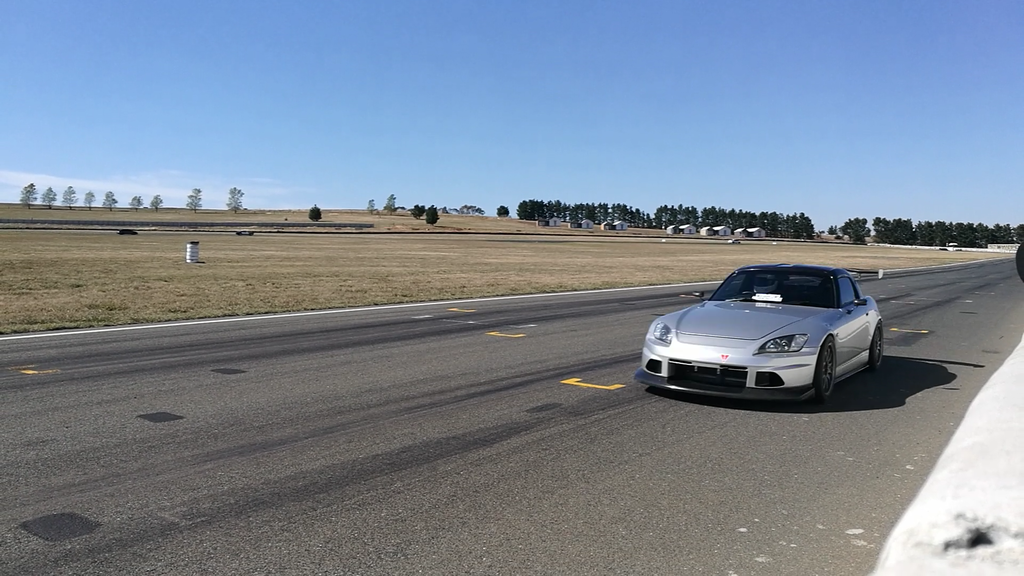
22/02/17 SPEED OFF THE STREETS DAY WAKEFIELD
First track day in 2017 and first time back at the track since August last year!
If you follow the thread you'll know I had a weird suspension (?) noise coming from the rear of the car after my track day at SMSP. I tried troubleshooting it but couldn't fix the issue so I spoke to the pros at Heasmans before heading to Japan and asked them to take a look when I got back. Back home and driving the car around there wasn't a noise anymore and to this day it hasn't come back so no idea what happened still. This stayed in the back of my mind a bit but I finally decided to just book a track day and deal with the noise if it came back.
In the previous updates I got the car ready with a service, adjustable arm install and an alignment so I was all packed and ready to head down to Wakefield mid week for a speed off the streets test day with some friends. The day before the event the car started making a slight knocking noise on slow speed turns. Kind of ignored it but it got worse on the way down to the track in the morning. Once arriving I checked the front passenger side and what would you know both bolts on the hardrace camber joint were loose. I'm always pretty anal with checking bolts and stuff but maybe I missed these? Maybe they just came loose? Either way I tightened them and checked them several times throughout the day and no issue still so that was resolved easily. Glad I checked before heading out and didn't continue to ignore the noise!
Early morning starts filling up on the way down to Goulburn
I didn't expect much from the day being my first time back out in a long time. I basically just wanted to put the car through its paces and make sure everything was 100% before committing to more track days throughout the year. With the new db limit I wasn't even sure I'd make it through the full day haha. Luckily they combined the SOTS with the test and tune race car day so db limit was raised to 95db and no issues ��
Some nice track company due to test and tune day being combined with SOTS
SESSION 1
I was placed in street car group A for the day so i went out with a couple friends hoping for a bit of fun and maybe a PB early on in the day. WRONG!
Traffic, traffic and more traffic! This whole first session was a waste. Didn't even get one clean lap in. The difference between SOTS drivers and experienced track day drivers was massive. No track etiquette. No clean passing. No signalling. It was a nightmare!
Basically used the session to test the brakes out at some of the heavier braking zones and got my tyres up to temp.
SESSION 2
After the horrible first session i asked to be moved up to race car group which had far less cars but also consisted of people who knew what they were doing. No roll cage though so i wasn't allowed
I was moved to street car group B though which had less cars. Was hoping that this would help and it did a little. Not as much traffic but still no etiquette. I had one guy in a 300ZX AKA boat want to drag me on every straight where he would pull ahead then proceed to go 50km/h around the top of the hill. Finally got past him and was able to put a couple laps together. With my tyre pressures still being out a little i managed a 1:10.3 from two full clean laps. One thing i was noticing on these laps was on the back straight where i used to be able to run 3rd gear out to redline before braking. I was no longer able to do this and was hitting red line considerably sooner than my brake marker. This was causing me to have to experiment with either letting off early or short shift a bit sooner and continue pushing for that bit longer before braking then downshifting 2 gears instead of 1.
Putting this down to the increased front camber allowing me to carry more speed onto the back straight. According to racechrono im 6km/h faster through turn 9 so its definitely helping.
SESSION 3
Finally had tyre pressures exactly where i wanted them. Went back out first in the group this time and tried to put a bit of space between me and the other guys to just concentrate on trying to get the PB. Put about half a lap gap between me and the next car in front when i entered the back straight. By the time i was hitting the hill i was back on their tails again -___-
Figured i just had to push through them and did just that. Few guys let me pass and a few tried to drag again. WHYYYYY!?
Got around the main group and once again only got a couple clean laps in. Good enough for a 1:10.0 though so i was close to my PB!
Again i was forced to shift on the back straight as i was just running out of third gear a lot earlier than usual. This became a regular occurrence during the day so car is definitely a lot quicker across the back side of the track.
SESSION 4
Was now the middle of the day so PB weather wasn't that great. Decided to have one more crack at it and removed the passenger seat for those extra tenths i needed. Didn't really work and i got another 1:10.2. Had a pretty fun battle with a 32 GTR in this session for a few laps. He would absolutely munch me down the straights but i would reel him back in across the top of the track before he pulled away again acrpss the back/main straights Was super fun watching his 4WD powerslide through some turns though!
Gave up on PBs at this stage and just hung around in the pits afterwards and had a lunch break.
SESSION 5
Gave a friend a go in the S2K as hes been thinking of buying one. He had a couple cracks at it and built his confidence up with each lap. Recorded a 1:14.1 after about 5 laps. Not bad considering hes half my height and my seat isn't that adjustable so he only just reached the pedals haha.
Safe to say the S2k bug has hit and he desperately wants one now!
That was it for the day. No PB but a good shakedown for the car/driver. Racechrono had an optimum of 1:08 so the potential is there and the car is definitely faster. Just about linking it all up now.
No issues to report back so ill book some more days and head back out soon!
Probably wont give SOTS days another go though.
PROS:
- No issues with the car
- Fun day with friends
- Car is definitely faster
CONS:
- No PB
- Silly drivers
Haven't even gone through my Go Pro footage yet but no PB or any memorable stuff that i remember so probably wont even bother. Heres a bunch of pics from the day though
Comment
-
Bonus video of renel driving the car

Comment
-
Unfortunately on my routine post track day check over I noticed that the rear brake pads had worn unevenly.
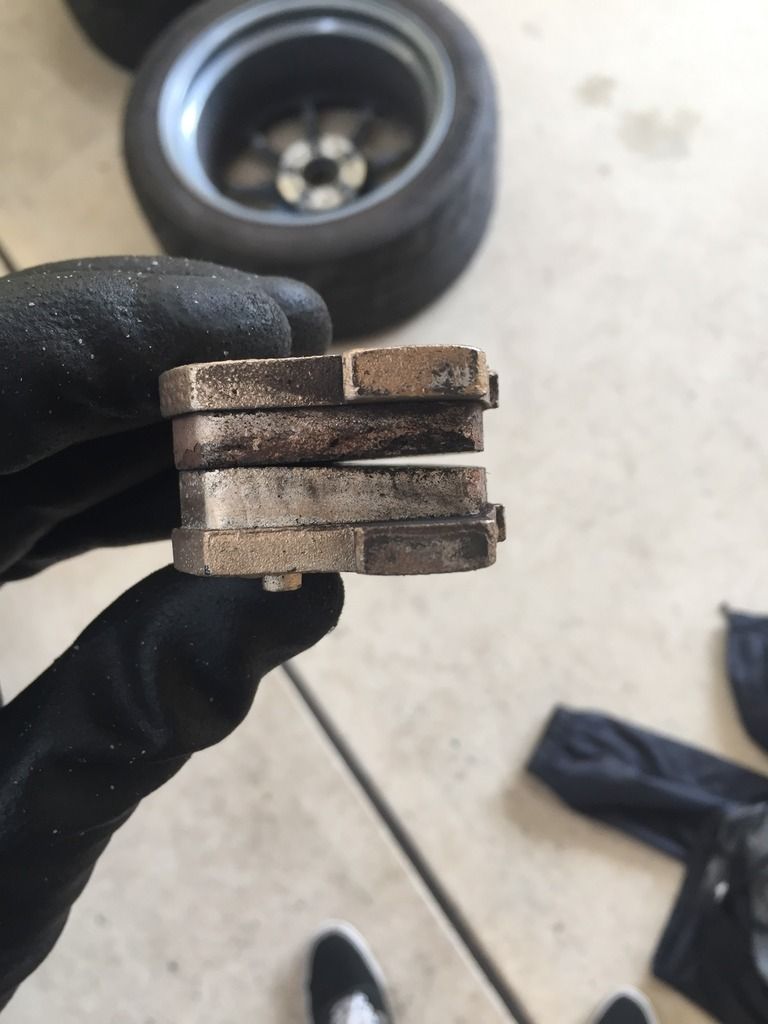
This was the same on both sides of the car with significant wear on the outside of the pad and none at all on the inside. The fronts were fine with even wear on both sides so the issue was isolated to the rear calipers only.
Doing a bit of research on s2ki this is quite a common issue. I'm actually surprised I hadn't encountered it sooner. The issue is usually caused by one of two things. The first being that the lube on the brake sliders dries out due to the extreme heat seen at the track thus allowing them to get stuck when braking causing an uneven distribution of brake force across the pad.
The second relates to the knobs on the back of the pads. They don't seat in the piston properly then sit askew which leads to the uneven wear.
As both are quite easy fixes and the fact that I don't know which one is the exact cause I decided to fix both in one go.
We will start with the caliper sliders. Basically these are the parts that slide back and forth when the brakes are applied. When they dry out they tend to get stuck so the fix is to pull the caliper apart, clean, apply new lube and put back together.
Quite simple. This procedure took about 10 minutes a corner. I decided that while the fronts didn't have any unusual wear it would be best to just apply some new lube anyway.
There are many different lubricants you can use for this job and different people swear by different brands/types. I just grabbed some new bendix high temp synthetic brake lubricant. It did the job well and so far no complaints.
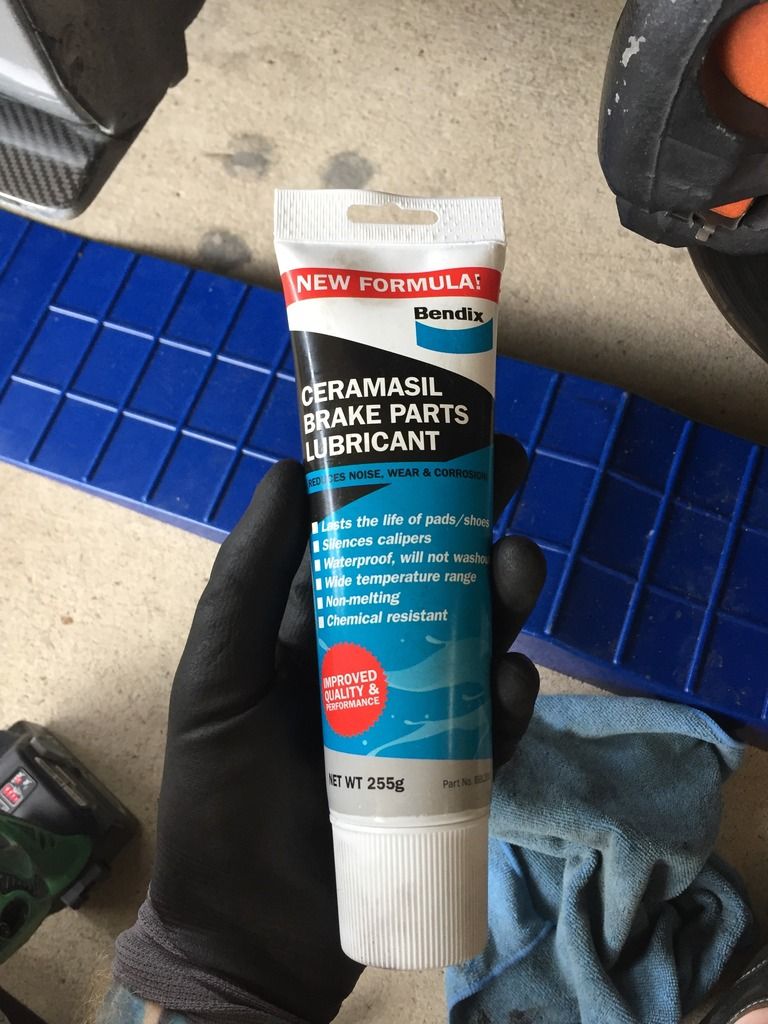

What I noticed straight away was how hard some of the sliders were to pull out. A couple had a thick build up of crud on them where the previous grease had dried out. I also noticed that upon putting the calipers back together I actually had to go grab the 19mm spanner to hold the slider in place when tightening the bolt. I've never had to do this on the front before but now the slider just free spins when I turn the bolt. Crazy to think that the slider was seized in place before and provided enough resistance to tighten against! Bendix lube doing its job! (Y)
Now that that was done I moved onto the potential second solution. The inner rear pad has knobs on it.
They are meant to slide into and seat on the piston but when they don't seat properly the pad is pushed at an angle as it doesn't sit flat. The obvious solution to this is to just take care when installing the pads and to make sure they're all lined up but this takes time. And sometimes trying to quickly swap the pads over at a track day this doesn't happen. Next option is to just grind the knobs off and no more issues
Makes for a quicker pad change now!
While I was playing around with the brakes I adjusted my handbrake a bit as lately I've been noticing that I have to use more force to activate the handbrake. With that all adjusted and everything in the rear back together hopefully that will be the end of my rear pad issues for a while.
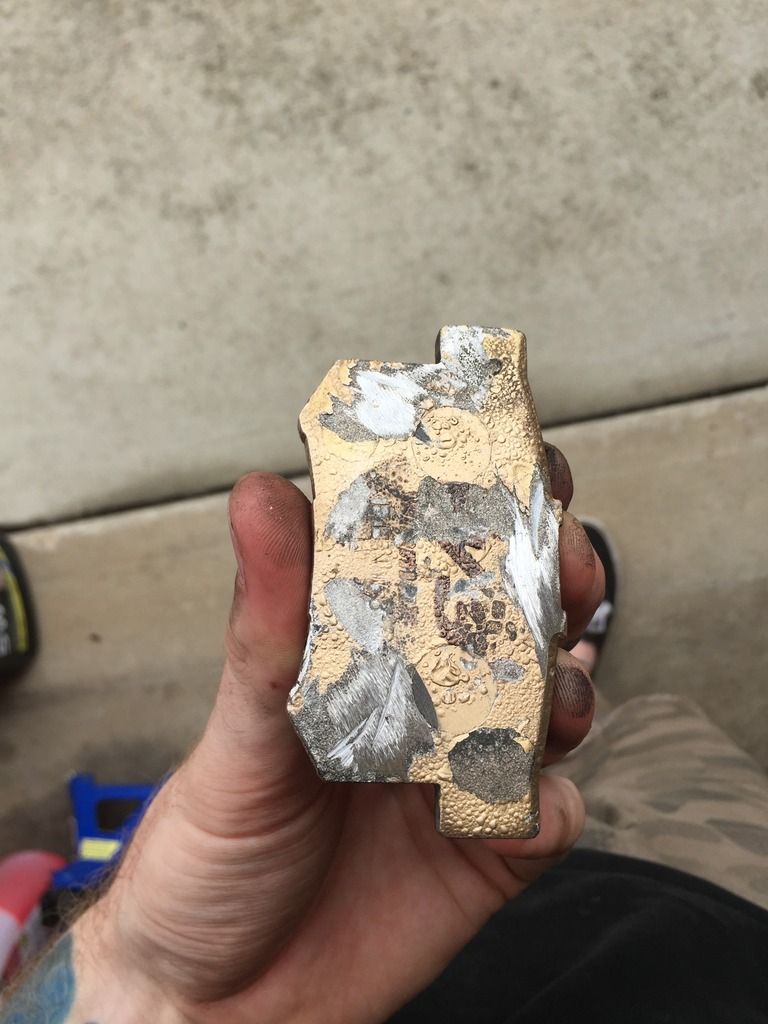
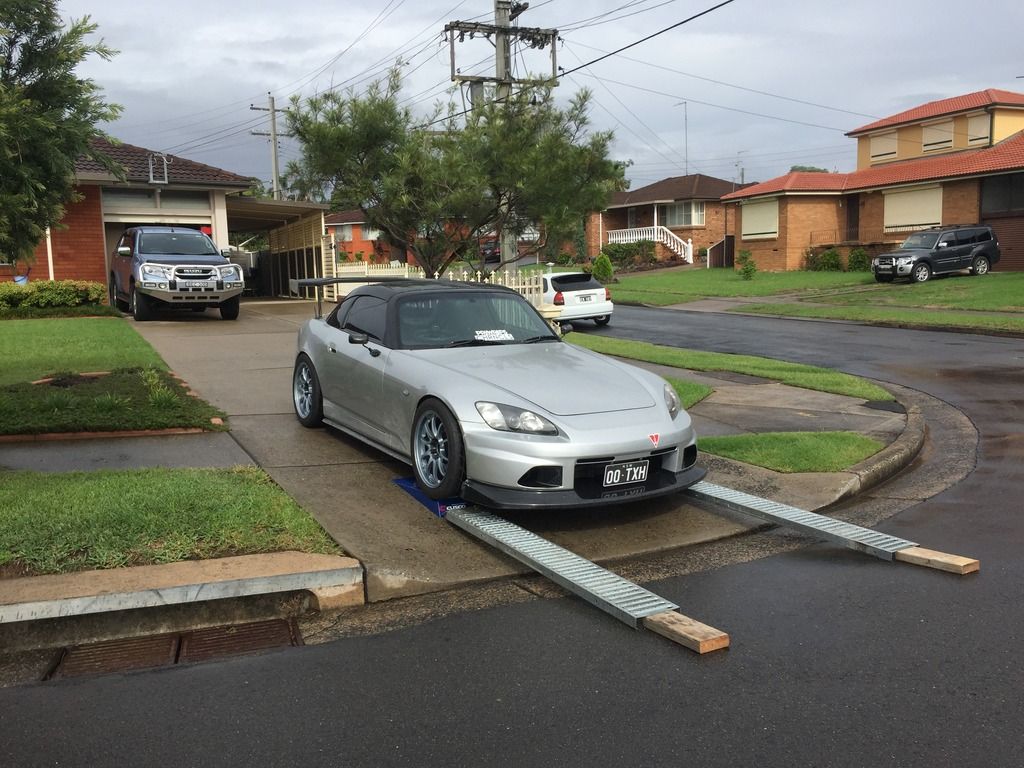
And just for a bit of fun. Here's a pic of my set up to get the car out of the driveway haha
Comment
-
I've always wanted a vented bonnet for the car. My original plan was to get an amuse or amuse style bonnet. 99% sure on amuse style as genuine amuse is 6k+ for a bonnet lol.
Anyway it looks like this
Getting a bonnet wasn't high up on the list of things to do so it was always in the back of my mind. That was until a bonnet came up for sale on a local classifieds page and I decided I needed it haha.

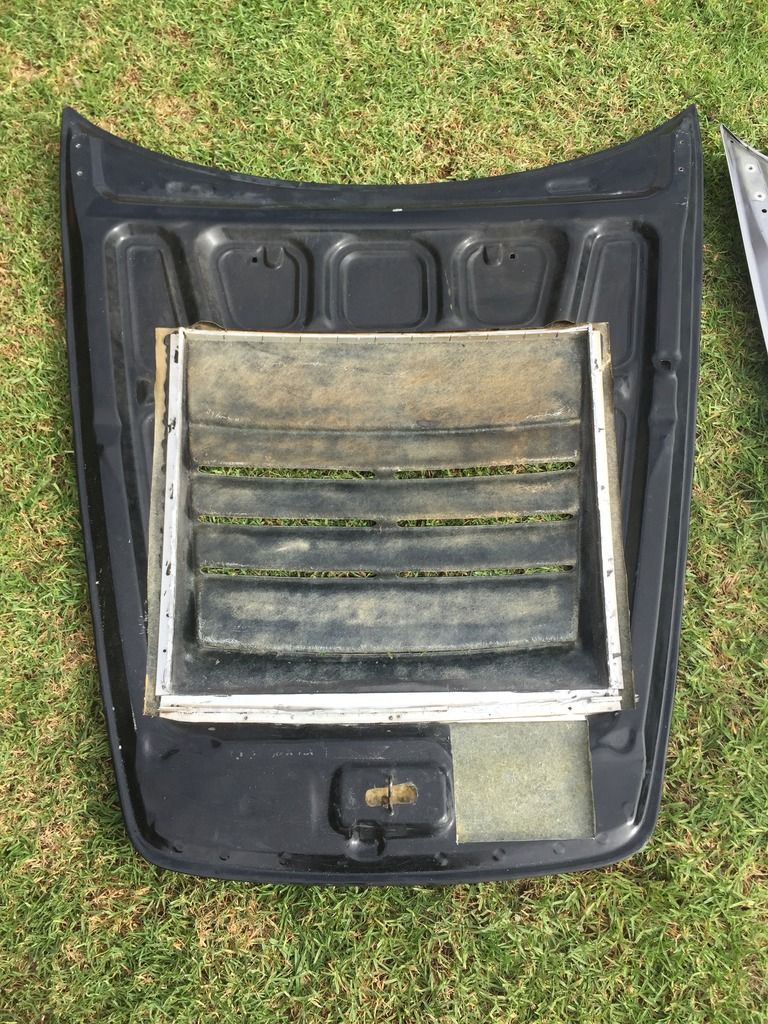
Not too different to the original amuse bonnet (a couple more vents really) but similar styles. It's a oem style carbon bonnet and it has been cut and modified with a c west style vent moulded into it.
So I went to check out and trial fit the bonnet and was happy with what I saw. Got it for a steal (under 1/10th the cost of an amuse bonnet) and took it home. Now came the fun task of modifying it and making it fit and function properly.
It's hard work for an aftermarket bonnet to come in lighter than the stock bonnet due to its lightweight aluminum construction. I wasn't expecting anything less here but when the bonnet came in at 1.1kg heavier than the stock bonnet I was a bit disappointed. I assumed a lot of the weight came from the extensive bracing on the underside of the bonnet holding the vent in.
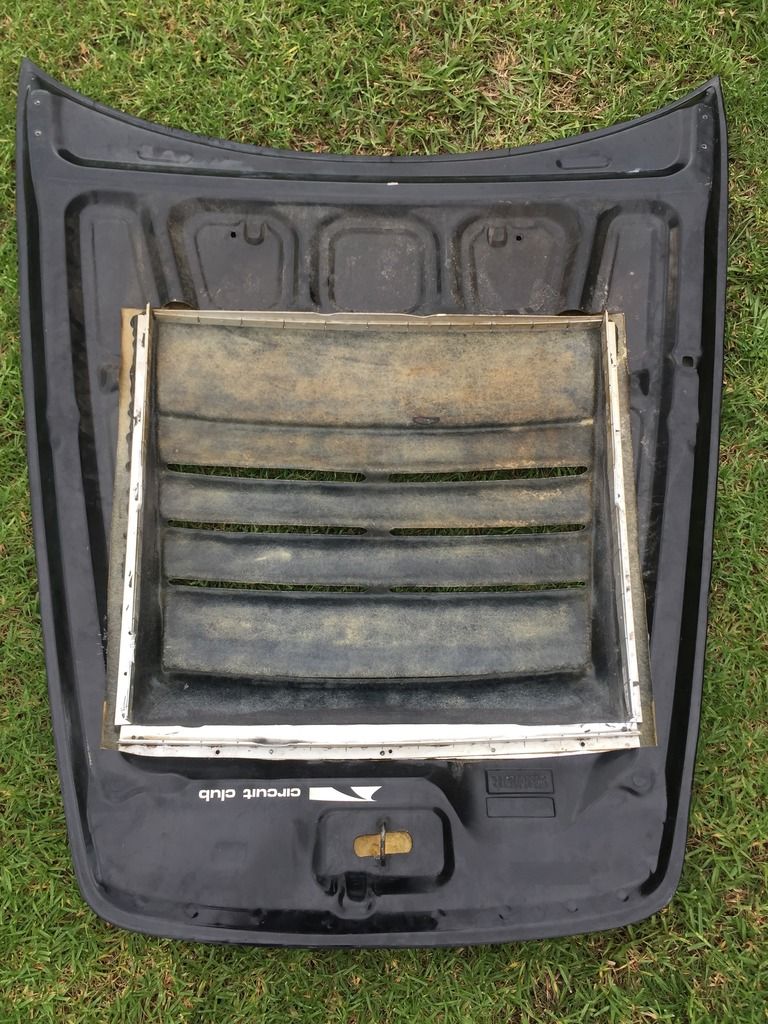
I assumed most of it was not necessary so I started cutting and removing pieces of the bracing. Some of it was necessary to clear my js racing intake so it wasn't completely useless. Then came some cutting of the actual bonnet to also clear the intake.
I was left with this
So now the bonnet was actually able to close and latch into place so I could begin adjusting and getting it to sit nicely. A lot of fiddling around with this stage but I eventually got there and the bonnet ended up fitting quite well for an aftermarket piece.
After seeing carbon bonnet failures at the track I 100% knew I was always going to run bonnet pins or aerocatch latches when the time came to get a bonnet. I visited v sport and opted to get aerocatchs in the lockable version so when the car does get parked away or on the occasional street drive it's still secure and someone just can't come up off the street and open my bonnet.
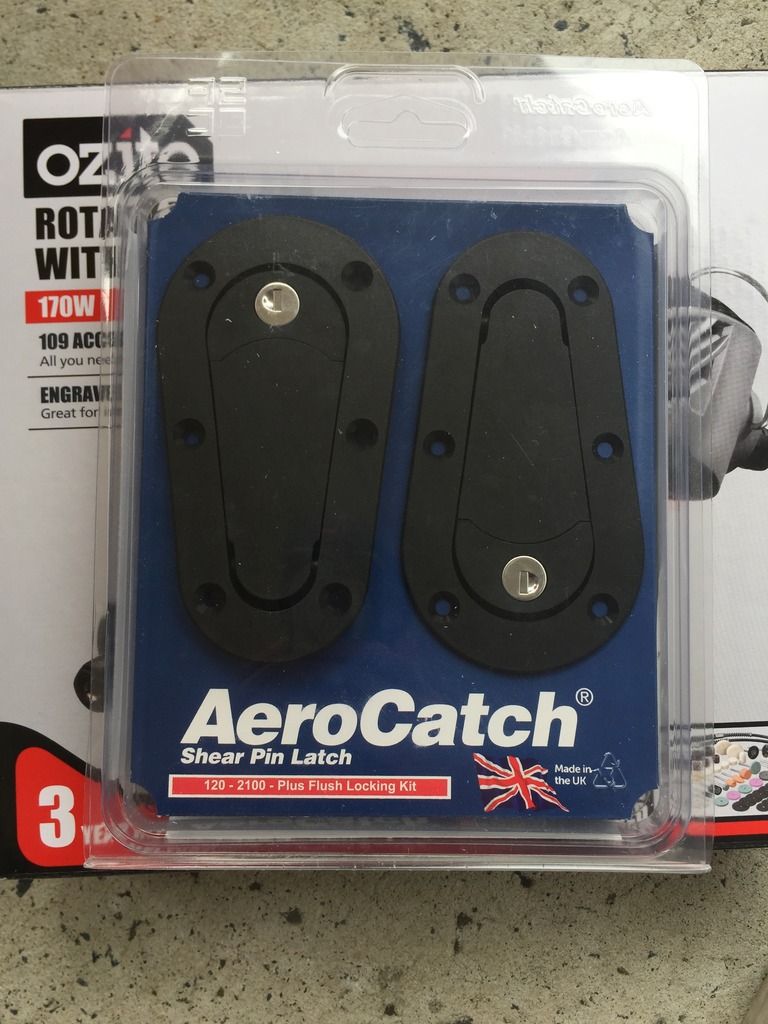
Now came the installation of the aerocatchs. The Js Racing cooling plate made this job a lot easier as it had cut outs for hood pin installation so fitment could only occur in one spot. This cut out a lot of the earlier guessing, planning and measuring on where to mount. You can see in the pic that i've taped up the oem bonnet latch opening in the cooling plate. Now that i was using the aerocatchs the latch system was no longer needed so more weight savings there.
I drilled the holes and got the posts installed and did the old toothpaste transfer trick to find out where i had to drill through the bonnet. Got that all done then masked and measured a remeasured and remeasured again...and again x5009876342371 times. Literally spent 2 hours measuring and readjusting because i wanted the latches to be perfect haha (OCD issues)
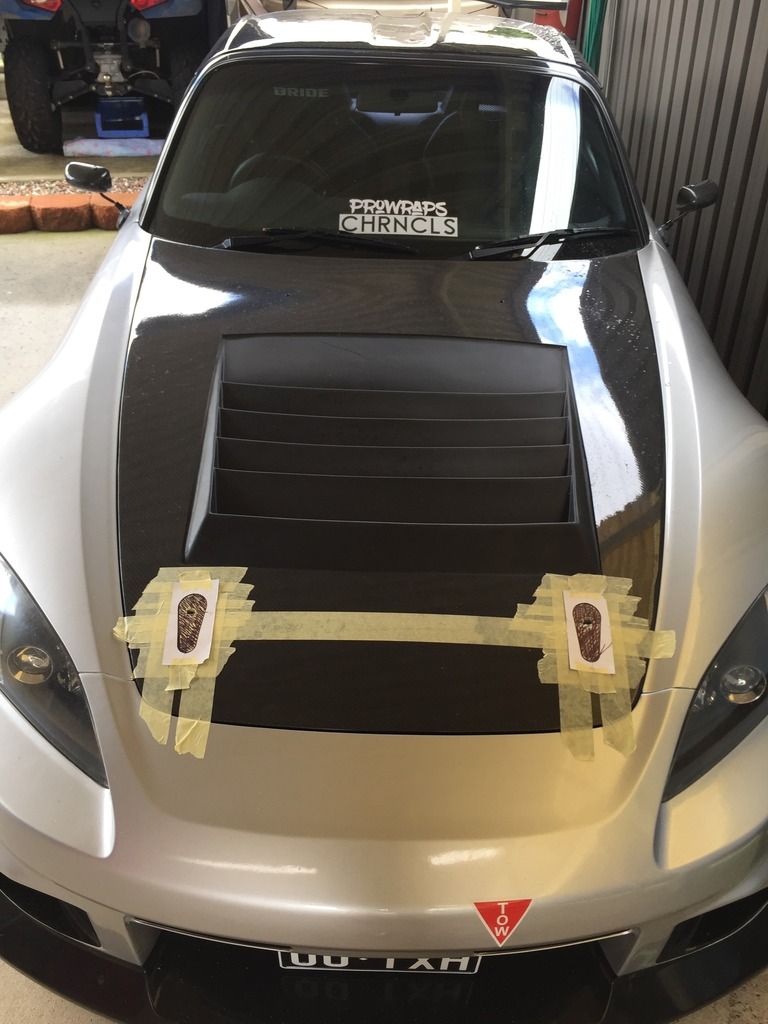
Now with everything marked and ready to go, it was time to start cutting. I bought a cheap bunnings rotary tool for this job and it performed great! Cut out the bonnet with no issues. More of the bonnet was cut out to accommodate the aerocatchs so im left with not much skeleton left at the front nose section. I was a bit worried about that at first thinking it might affect structural rigidity but after doing a SMSP track day last week there was no issues with the bonnet with speeds up to 210km/h. Might cut the rest out in time.
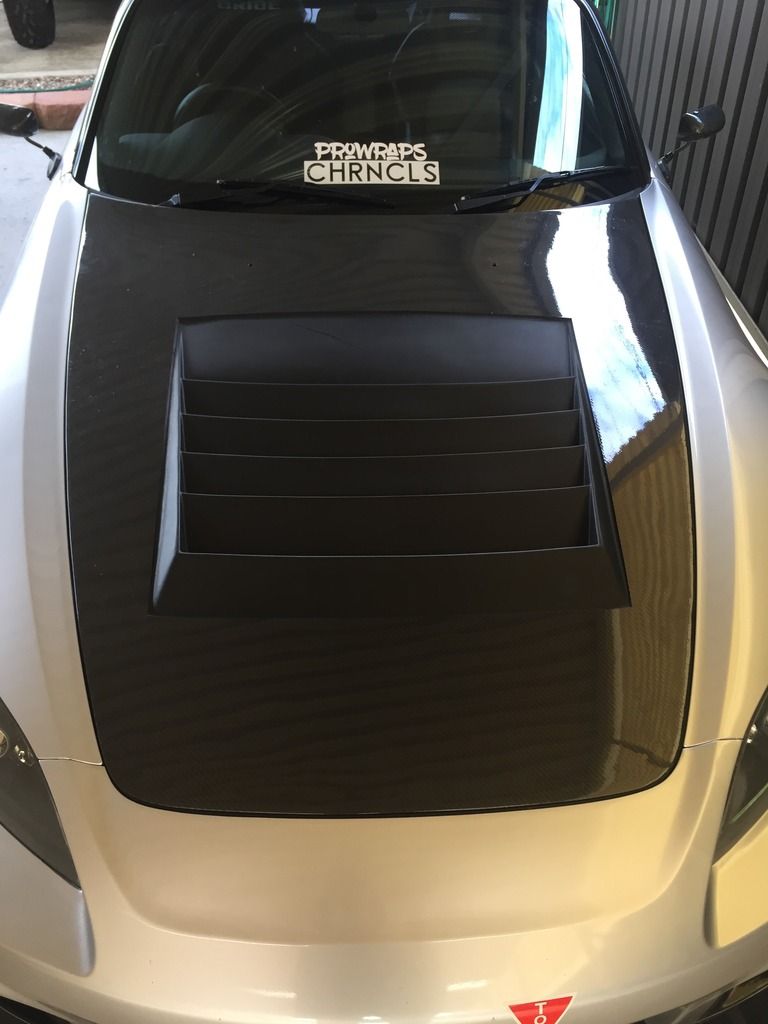
And now the (semi) finished product
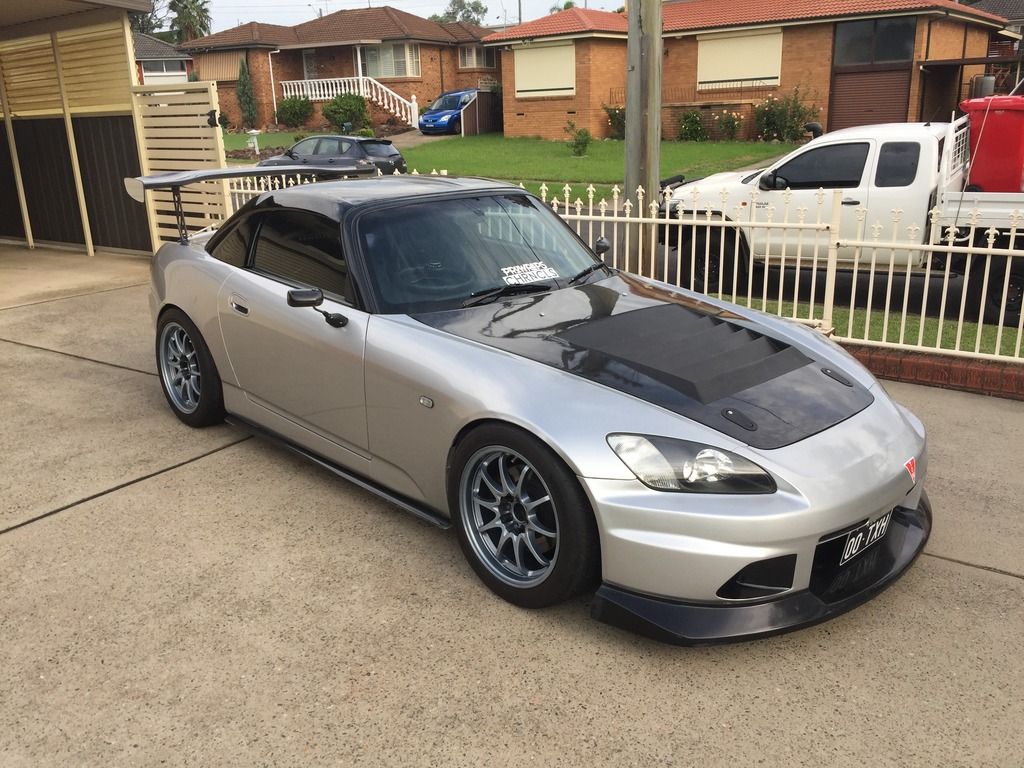
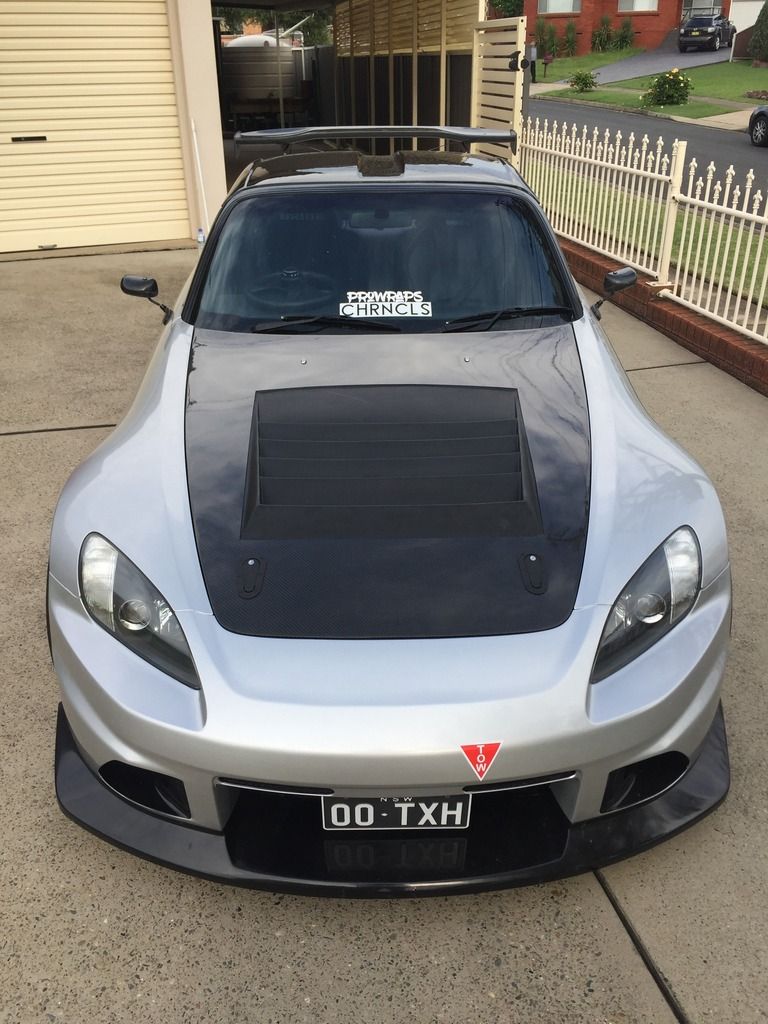
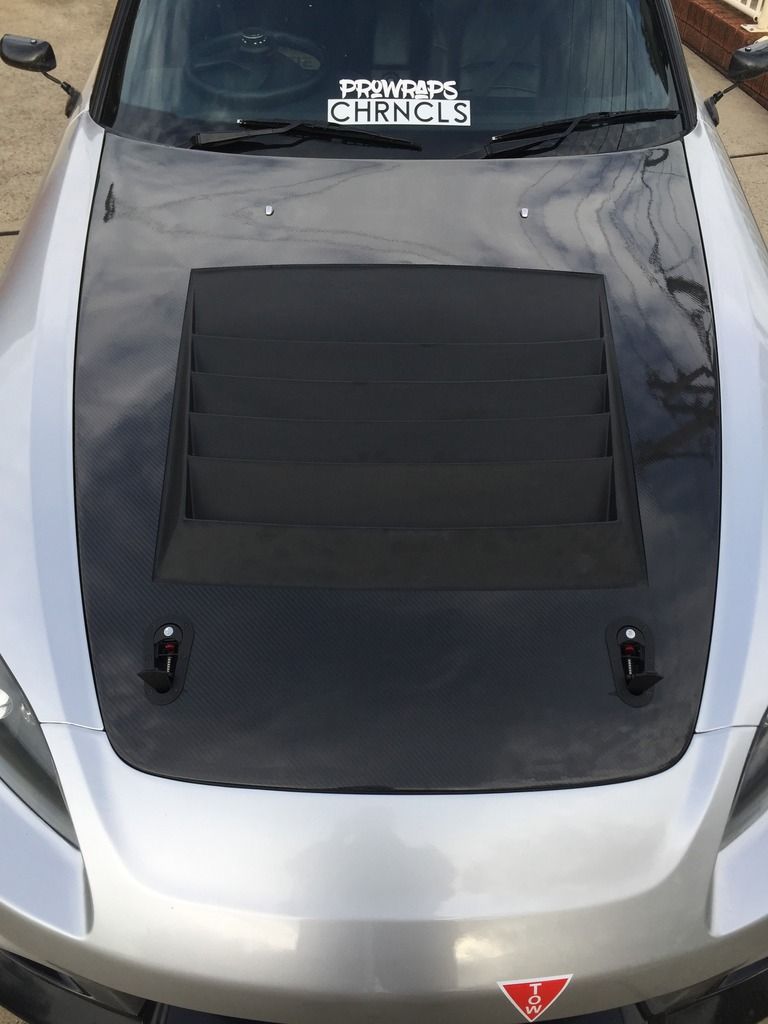
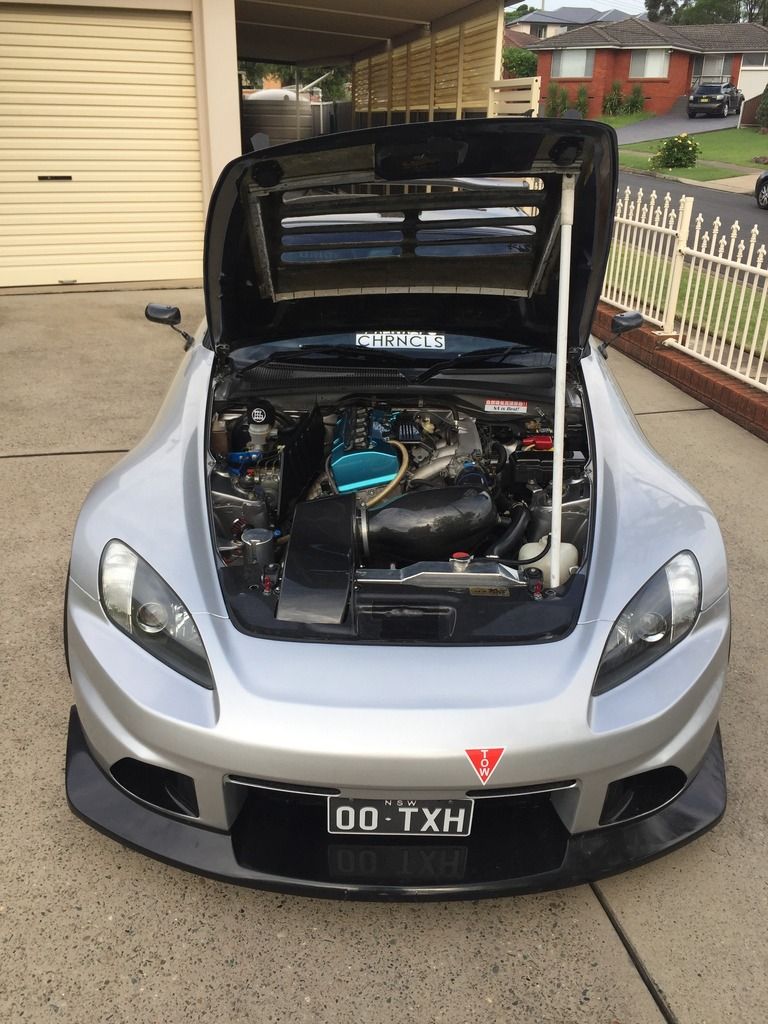
I say semi finished because i still need to wrap the bonnet to blend in with the car for a more subtle look. I like the carbon look but i know i will like the silver look a lot more!
And now for the final verdict. With the removal of the excess material and the factory latch system and the addition of the aerocatch system the new bonnet now comes in at 7.5kg which is 610g lighter than the stock bonnet. Not much at all but i knew it'd be hard to beat the stock one. However the new bonnet changes the looks of the car (hey looks are important! :P) and gives it a more aggressive demeanor. It will aid aero a bit and will drastically affect engine bay temps by letting the hot air escape through the vent.Last edited by Toddxxx; 11-04-17, 04:09 AM.Comment
-
Bonnet looks mad. Looks a lot more aggressive nowComment
-
Thanks guys! Happy with how it all turned out
Comment

Comment