Firstly, these instructions are provided for your guide only - no responsibility taken by ClubITR or myself in case of injury/damage.
STEP ONE: For your own comfort park the car in a cool, shady spot.
STEP TWO: Block the front wheels so that the car won't roll once you jack it up.
STEP THREE: Now before jacking the car up off the ground, loosen the lug nuts on the wheels just enough to break them free. Then jack the car up.
CAUTION: Never attempt to work on an elevated vehicle held in place only by a hydraulic jack - always use jack stands.
STEP FOUR: Remove the lug nuts and then the wheel. Place the wheel underneath the car (in between the jack stands). In the event of a faulty jack stand the wheel will break the vehicle's fall reducing damage and possibly saving your life.
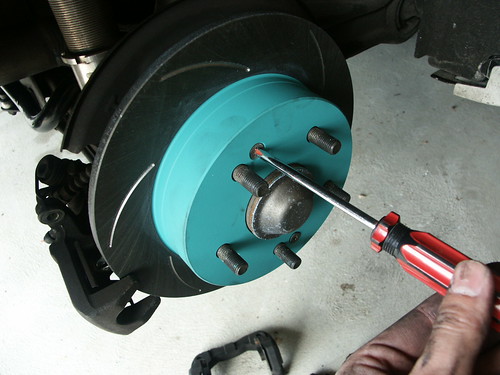
STEP FIVE: You should now be looking at a caliper, a rotor, two brake pads (one on either side of the rotor) and some bolts and clips that hold it all together. Unscrew the 2 phillips screws holding the rotor onto the spindle. You may need a impact driver for this task. Remove dust sheld on the back of the caliper, it is held on with 2 10mm bolts
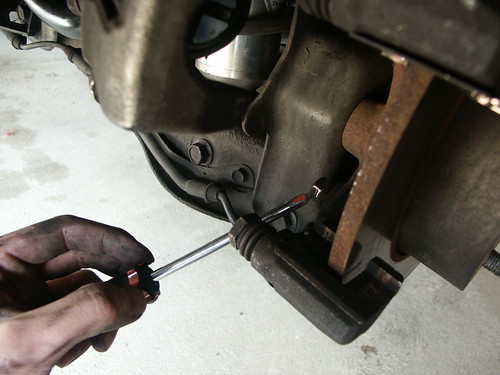
STEP SIX: Remove the 2 12mm bolts holding the caliper. You might need a 17mm spanner to hold the "floating" nut while doing this.


STEP SEVEN: Remove brake pads. Examine that their surfaces are flat, otherwise use sandpaper to sand them down. Now remove the 2 14mm bolts holding the bracket.
STEP EIGHT: Knock out old rotor and replace with new one, paying attention to the 2 small holes which the phillips screws will sit
STEP NINE: Replace phllips screws
STEP TEN: Replace 2 14mm bolts and tighten to 56Nm
STEP ELEVEN: Turn back rear caliper piston with a rear caliper brake tool, about one full turn should suffice. Line up the + with the studs on your pads.
STEP TWELVE: Replace 2 12mm bolts holding caliper onto bracket. Once again you may need a 17mm spanner to hold the nut while u tighten. Tighten bolts to 23NM
STEP THIRTEEN: Replace dust shield.
STEP FOURTEEN: Finito

STEP FIFTEEHN: Replace wheels and tighten wheel nuts to 100Nm
Before driving the car you must apply pressure to the brake pedal several times. This will push the piston --> brake pads --> rotor. Ensure that your brakes are working before going for a test drive.
STEP ONE: For your own comfort park the car in a cool, shady spot.
STEP TWO: Block the front wheels so that the car won't roll once you jack it up.
STEP THREE: Now before jacking the car up off the ground, loosen the lug nuts on the wheels just enough to break them free. Then jack the car up.
CAUTION: Never attempt to work on an elevated vehicle held in place only by a hydraulic jack - always use jack stands.
STEP FOUR: Remove the lug nuts and then the wheel. Place the wheel underneath the car (in between the jack stands). In the event of a faulty jack stand the wheel will break the vehicle's fall reducing damage and possibly saving your life.
STEP FIVE: You should now be looking at a caliper, a rotor, two brake pads (one on either side of the rotor) and some bolts and clips that hold it all together. Unscrew the 2 phillips screws holding the rotor onto the spindle. You may need a impact driver for this task. Remove dust sheld on the back of the caliper, it is held on with 2 10mm bolts
STEP SIX: Remove the 2 12mm bolts holding the caliper. You might need a 17mm spanner to hold the "floating" nut while doing this.
STEP SEVEN: Remove brake pads. Examine that their surfaces are flat, otherwise use sandpaper to sand them down. Now remove the 2 14mm bolts holding the bracket.
STEP EIGHT: Knock out old rotor and replace with new one, paying attention to the 2 small holes which the phillips screws will sit
STEP NINE: Replace phllips screws
STEP TEN: Replace 2 14mm bolts and tighten to 56Nm
STEP ELEVEN: Turn back rear caliper piston with a rear caliper brake tool, about one full turn should suffice. Line up the + with the studs on your pads.
STEP TWELVE: Replace 2 12mm bolts holding caliper onto bracket. Once again you may need a 17mm spanner to hold the nut while u tighten. Tighten bolts to 23NM
STEP THIRTEEN: Replace dust shield.
STEP FOURTEEN: Finito
STEP FIFTEEHN: Replace wheels and tighten wheel nuts to 100Nm
Before driving the car you must apply pressure to the brake pedal several times. This will push the piston --> brake pads --> rotor. Ensure that your brakes are working before going for a test drive.
Comment